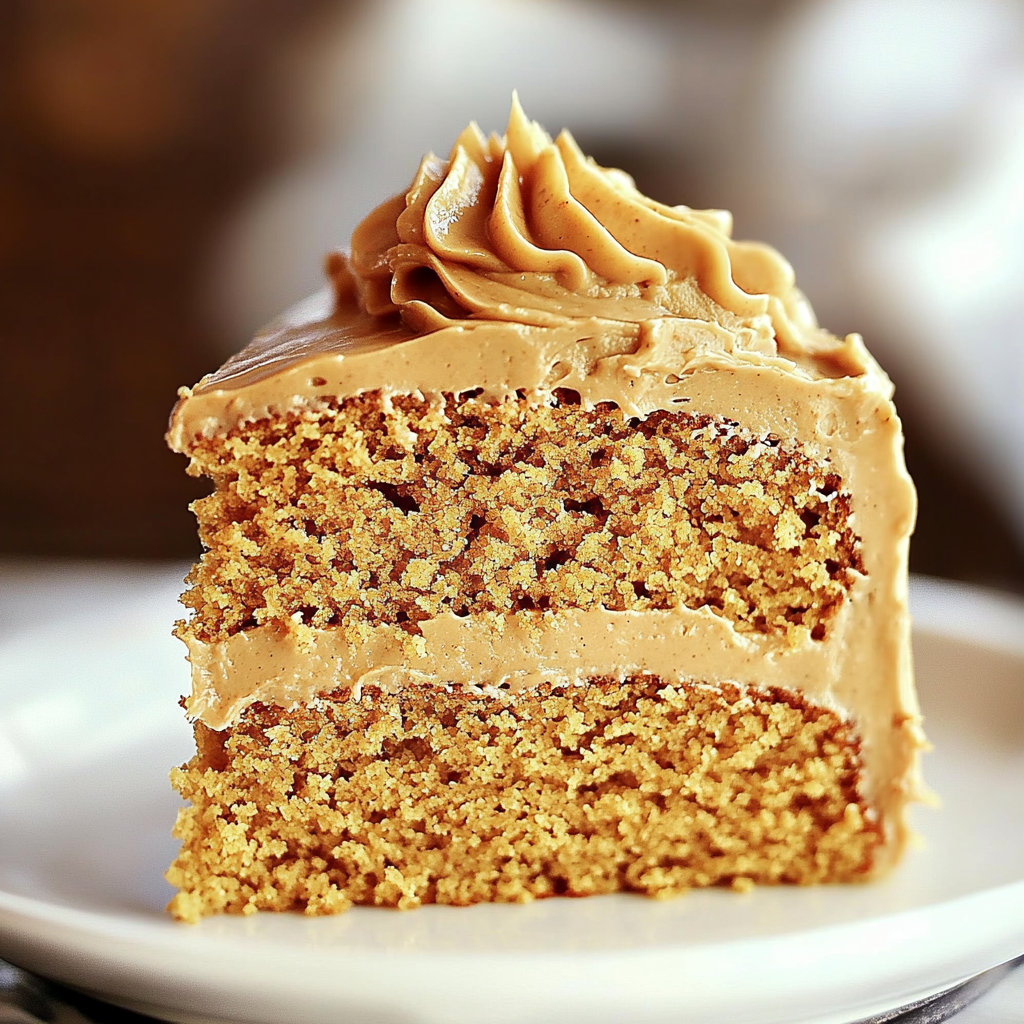
Rich, moist, and bursting with peanut butter flavor, this peanut butter cake with peanut butter frosting is a decadent dessert that will delight any peanut butter lover. The creamy frosting complements the tender cake perfectly, making it an irresistible treat for birthdays, potlucks, or just because!
Why You’ll Love This Recipe
- Peanut butter overload: Packed with peanut butter in both the cake and frosting.
- Moist and tender: The perfect texture for a classic homemade cake.
- Easy to make: Simple ingredients and straightforward steps.
- Perfect for any occasion: A showstopper for celebrations or a sweet indulgence any day.
Ingredients
(Tip: You’ll find the full list of ingredients and measurements in the recipe card below.)
For the Cake:
- All-purpose flour
- Baking powder
- Baking soda
- Salt
- Unsalted butter, softened
- Creamy peanut butter
- Granulated sugar
- Brown sugar
- Eggs
- Vanilla extract
- Whole milk or buttermilk
For the Frosting:
- Creamy peanut butter
- Unsalted butter, softened
- Powdered sugar
- Vanilla extract
- Heavy cream or milk (to adjust consistency)
Directions

Make the Cake:
- Preheat the oven: Preheat your oven to 350°F (175°C). Grease and flour two 9-inch round cake pans or a 9×13-inch baking dish.
- Mix dry ingredients: In a medium bowl, whisk together flour, baking powder, baking soda, and salt.
- Cream butter and peanut butter: In a large mixing bowl, beat the softened butter and peanut butter until creamy and smooth. Add the granulated sugar and brown sugar, beating until light and fluffy.
- Add eggs and vanilla: Beat in the eggs one at a time, followed by the vanilla extract.
- Combine wet and dry: Gradually add the dry ingredients to the wet mixture, alternating with the milk or buttermilk, starting and ending with the dry ingredients. Mix just until combined.
- Bake: Pour the batter into the prepared pans and smooth the tops. Bake for 25-30 minutes for round pans (35-40 minutes for a 9×13-inch pan), or until a toothpick inserted into the center comes out clean.
- Cool: Allow the cakes to cool in the pans for 10 minutes before transferring to a wire rack to cool completely.
Make the Frosting:
- Cream butter and peanut butter: In a large bowl, beat the peanut butter and softened butter together until smooth and creamy.
- Add powdered sugar: Gradually add powdered sugar, beating until fluffy.
- Add vanilla and cream: Mix in vanilla extract and enough heavy cream or milk to achieve your desired frosting consistency.
Assemble the Cake:
- If using round cakes, place one layer on a serving plate. Spread a thick layer of frosting on top. Add the second layer and frost the top and sides.
- For a 9×13-inch cake, simply spread the frosting evenly over the cooled cake.
- Optional: Garnish with chopped peanuts, a drizzle of chocolate, or extra peanut butter swirls.
Servings and Timing
- Servings: Serves 12-16
- Prep Time: 20 minutes
- Cook Time: 30 minutes
- Total Time: 50 minutes
Variations
- Chocolate peanut butter cake: Add ½ cup of cocoa powder to the dry ingredients for a chocolatey twist.
- Peanut butter swirl: Swirl melted peanut butter into the batter before baking for added texture and flavor.
- Layered sheet cake: Bake in a sheet pan and cut into layers for a unique presentation.
- Crunchy texture: Mix chopped peanuts or peanut butter chips into the batter.
Storage/Reheating
- Storage: Store the frosted cake in an airtight container at room temperature for up to 2 days, or in the refrigerator for up to 5 days.
- Freezing: Freeze unfrosted cake layers wrapped tightly in plastic wrap for up to 2 months. Thaw before frosting.
FAQs
1. Can I use natural peanut butter?
Natural peanut butter can be used, but the cake may have a slightly different texture due to its oil content. Stir well before using.
2. What type of milk works best?
Whole milk or buttermilk adds richness, but any milk, including non-dairy alternatives, can be used.
3. Can I make this cake gluten-free?
Yes, substitute with a gluten-free all-purpose flour blend.
4. How do I prevent the cake from being dry?
Avoid overmixing the batter and be careful not to overbake. Use a toothpick to check for doneness.
5. Can I use chunky peanut butter?
Yes, chunky peanut butter adds a delightful texture to the cake and frosting.
6. Can I make cupcakes with this recipe?
Yes, bake in a lined muffin tin for 18-22 minutes.
7. What’s the best way to frost the cake smoothly?
Use an offset spatula and frost the cake in thin layers, chilling between coats if needed.
8. Can I make the frosting ahead of time?
Yes, store it in the refrigerator for up to 3 days. Bring to room temperature and beat before using.
9. Can I use this recipe for a bundt cake?
Yes, bake in a greased bundt pan for 40-45 minutes.
10. What pairs well with peanut butter cake?
Serve with a glass of milk, coffee, or a scoop of vanilla ice cream for a delightful treat.
Conclusion
Peanut butter cake with peanut butter frosting is a decadent dessert that’s perfect for any occasion. With its rich flavor, tender texture, and creamy frosting, this cake is a must-try for peanut butter enthusiasts. Customize it to your liking, and enjoy every bite of this indulgent treat!
PrintPeanut Butter Cake with Peanut Butter Frosting
This decadent peanut butter cake is rich and tender, topped with a smooth peanut butter frosting that adds the perfect touch of sweetness. It’s an ideal dessert for gatherings or a delightful treat to satisfy your peanut butter cravings.
- Prep Time: 20 minutes
- Cook Time: 35 minutes
- Total Time: 55 minutes
- Yield: 12 servings 1x
- Category: Dessert
- Method: Baking
- Cuisine: American
Ingredients
- For the Cake:
- 2⅔ cups self-rising flour
- 2 teaspoons baking soda
- 2 cups granulated sugar
- ½ cup unsalted butter, softened
- 1 cup creamy peanut butter
- 2 large eggs
- 2 cups buttermilk
- For the Frosting:
- 4 cups powdered sugar
- 1½ cups creamy peanut butter
- 8 ounces cream cheese, softened
- 2 tablespoons milk
Instructions
- Prepare the Cake Batter:
- Preheat your oven to 350°F (175°C). Grease and flour three 8-inch round cake pans or a 9×13-inch baking dish.
- In a large mixing bowl, combine the sugar, softened butter, and 1 cup of peanut butter. Beat with an electric mixer until smooth and creamy.
- Add the eggs one at a time, beating well after each addition.
- In a separate bowl, whisk together the self-rising flour and baking soda.
- Alternately add the dry ingredients and buttermilk to the peanut butter mixture, beginning and ending with the dry ingredients. Mix until just combined.
- Bake the Cake:
- Divide the batter evenly among the prepared pans.
- Bake in the preheated oven for about 35 minutes, or until a toothpick inserted into the center comes out clean.
- Allow the cakes to cool in the pans for 10 minutes, then turn them out onto wire racks to cool completely.
- Prepare the Frosting:
- In a large bowl, combine the powdered sugar, 1½ cups of peanut butter, softened cream cheese, and 2 tablespoons of milk. Beat until smooth and creamy. If the frosting is too thick, add additional milk, one teaspoon at a time, until the desired consistency is reached.
- Assemble the Cake:
- Place one cake layer on a serving plate and spread a layer of frosting on top.
- Repeat with the remaining layers, then frost the top and sides of the cake.
- For a decorative touch, sprinkle chopped roasted peanuts or mini chocolate chips on top.
Notes
- Ensure all ingredients are at room temperature before beginning for the best results.
- If you don’t have self-rising flour, you can make your own by combining 2⅔ cups of all-purpose flour with 4 teaspoons of baking powder and 1 teaspoon of salt.
- This cake can be stored in an airtight container at room temperature for up to 3 days or refrigerated for up to a week.

