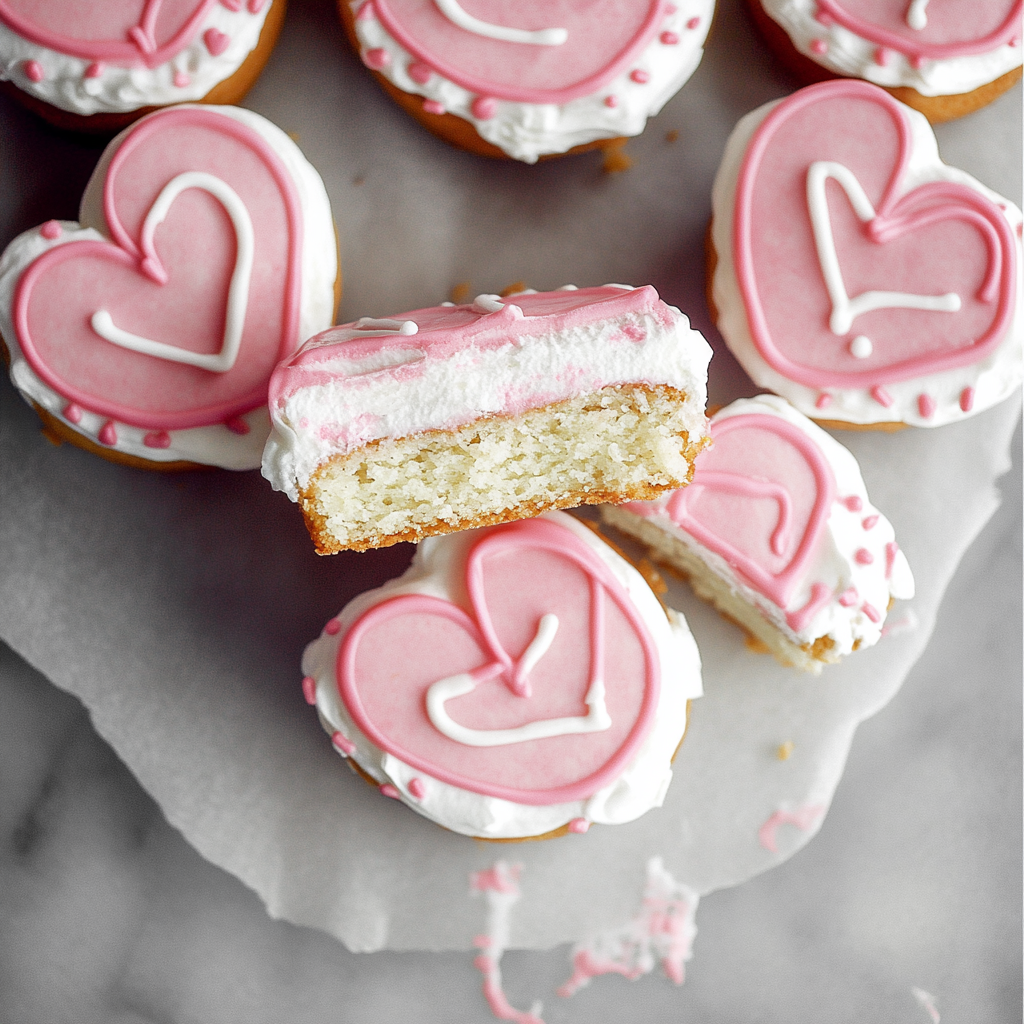
These Copycat Little Debbie Valentine Cakes bring all the nostalgia and charm of the original snack cakes, with a homemade touch. Made with soft layers of fluffy vanilla cake, a creamy filling, and a sweet glaze, these heart-shaped treats are perfect for Valentine’s Day or any celebration of love.
Why You’ll Love This Recipe
- A homemade version of a beloved childhood treat.
- Perfectly soft cake layers with a creamy, sweet filling.
- Easy to customize with colors, flavors, and decorations.
- Great for gifting, party favors, or simply indulging in nostalgia.
- Fun and festive for Valentine’s Day or romantic occasions.
Ingredients
(Tip: You’ll find the full list of ingredients and measurements in the recipe card below.)
For the Cake:
- All-purpose flour
- Baking powder
- Salt
- Unsalted butter (softened)
- Granulated sugar
- Eggs
- Vanilla extract
- Milk
- Red or pink food coloring
For the Filling:
- Unsalted butter (softened)
- Powdered sugar
- Marshmallow creme (or fluff)
- Vanilla extract
For the Glaze:
- Powdered sugar
- Milk
- Vanilla extract
- Pink or red food coloring
For Decoration:
- Heart sprinkles or nonpareils
Directions

Make the Cake:
- Preheat Oven: Preheat your oven to 350°F (175°C) and line a large rimmed baking sheet or jelly roll pan with parchment paper.
- Mix Dry Ingredients: In a medium bowl, whisk together flour, baking powder, and salt.
- Cream Butter and Sugar: In a large bowl, beat butter and sugar until light and fluffy. Add eggs one at a time, followed by vanilla extract and food coloring.
- Combine Wet and Dry: Gradually mix the dry ingredients into the wet ingredients, alternating with milk, until smooth.
- Bake: Spread the batter evenly in the prepared pan and bake for 12-15 minutes, or until a toothpick inserted in the center comes out clean. Let the cake cool completely.
Prepare the Filling:
- Beat softened butter and powdered sugar until smooth and creamy.
- Add marshmallow creme and vanilla extract, mixing until fully combined.
Assemble the Cakes:
- Cut Shapes: Use a heart-shaped cookie cutter to cut out pairs of hearts from the cooled cake.
- Add Filling: Spread or pipe the marshmallow filling onto one heart and top with another heart to create a sandwich.
Glaze the Cakes:
- Make the Glaze: In a bowl, mix powdered sugar, milk, vanilla extract, and food coloring until smooth. Adjust consistency as needed by adding more powdered sugar or milk.
- Coat the Cakes: Place the filled cakes on a wire rack over a baking sheet. Spoon the glaze over each cake, allowing excess to drip off.
- Decorate: While the glaze is still wet, add heart sprinkles or decorations. Let the glaze set completely.
Servings and Timing
- Servings: Makes about 8-10 cakes, depending on cutter size
- Preparation Time: 20 minutes
- Baking Time: 15 minutes
- Decorating Time: 30 minutes
- Total Time: About 1 hour 15 minutes
Variations
- Chocolate Version: Add cocoa powder to the cake batter and use chocolate glaze for a decadent twist.
- Strawberry Filling: Add a touch of strawberry jam to the marshmallow filling for extra flavor.
- Lemon Glaze: Replace vanilla extract in the glaze with lemon juice for a tangy finish.
- Mini Cakes: Use smaller cookie cutters for bite-sized treats.
- Vegan Option: Use plant-based butter, a flax egg (1 tablespoon flaxseed meal + 2.5 tablespoons water), and almond or oat milk.
Storage/Reheating
- Storage: Store the cakes in an airtight container at room temperature for up to 2 days or in the refrigerator for up to 5 days.
- Freezing: Wrap the cakes individually in plastic wrap and freeze for up to 2 months. Thaw at room temperature before serving.
FAQs
Can I use a box cake mix?
Yes, using a vanilla or white box cake mix is a convenient shortcut for the cake base.
How do I keep the glaze smooth?
Sift the powdered sugar before mixing and ensure the glaze is not too thick or thin.
Can I make these cakes gluten-free?
Yes, use a gluten-free flour blend for the cake and ensure all other ingredients are gluten-free.
How do I prevent the cake from sticking to the cutter?
Dip the cookie cutter in powdered sugar or flour before cutting.
Can I use store-bought frosting?
Yes, store-bought marshmallow or vanilla frosting works well for the filling.
How do I make the colors more vibrant?
Use gel food coloring for more intense and vibrant hues without altering the consistency.
What’s the best way to glaze the cakes?
Use a spoon to pour the glaze over the cakes, or dip the tops directly into the glaze for an even coat.
Can I make these cakes ahead of time?
Yes, prepare the cakes and store them in the refrigerator. Add the glaze and decorations on the day of serving.
How do I make the cakes more festive?
Use themed sprinkles, edible glitter, or add writing with piping gel to personalize each cake.
What can I do with leftover cake scraps?
Use them to make cake pops or layer them in a trifle with whipped cream and fruit.
Conclusion
Copycat Little Debbie Valentine Cakes are a homemade take on a nostalgic favorite, perfect for spreading love and joy. With their soft cake layers, creamy filling, and festive glaze, these heart-shaped treats are sure to delight anyone who tastes them. Customize them to your liking, and enjoy a sweet and thoughtful way to celebrate Valentine’s Day or any special occasion!
PrintCopycat Little Debbie Valentine Cakes
These Copycat Little Debbie Valentine Cakes are a homemade version of the nostalgic treat! Soft vanilla cake layers are filled with sweet cream, shaped into hearts, and coated in a smooth white chocolate shell, making them perfect for Valentine’s Day or a fun baking project.
- Prep Time: 20 minutes
- Chill Time: 30 minutes
- Cook Time: 30 minutes
- Total Time: 1 hour 20 minutes
- Yield: 6 double-layer heart cakes 1x
- Category: Dessert
- Method: Baking
- Cuisine: American
Ingredients
For the Cake:
- 1 1/4 cups all-purpose flour
- 1 tsp baking powder
- 1/4 tsp baking soda
- 1/4 tsp salt
- 1/2 cup unsalted butter, softened
- 3/4 cup granulated sugar
- 2 large eggs
- 1 tsp vanilla extract
- 1/2 cup buttermilk
- Red gel food coloring
For the Cream Filling:
- 1/2 cup unsalted butter, softened
- 1 1/2 cups powdered sugar
- 1 tsp vanilla extract
- 2 tbsp heavy cream
For the Coating:
- 12 oz white chocolate or white candy melts
- 2 oz pink or red candy melts (for decoration)
Instructions
1. Bake the Cake:
- Preheat your oven to 350°F (175°C). Line a 9×13-inch baking pan with parchment paper and lightly grease it.
- In a medium bowl, whisk together flour, baking powder, baking soda, and salt.
- In a large bowl, cream together butter and sugar until light and fluffy. Add eggs one at a time, mixing well after each addition. Stir in vanilla extract.
- Gradually alternate adding the dry ingredients and buttermilk to the wet mixture, beginning and ending with the dry ingredients. Add a few drops of red gel food coloring to achieve a vibrant pink hue.
- Pour the batter into the prepared pan and spread evenly. Bake for 18-20 minutes, or until a toothpick inserted into the center comes out clean. Cool completely.
2. Make the Cream Filling:
- In a large bowl, beat butter until creamy. Gradually add powdered sugar, mixing until smooth.
- Add vanilla extract and heavy cream, beating until light and fluffy.
3. Assemble the Cakes:
- Use a heart-shaped cookie cutter to cut out heart shapes from the cooled cake. You should get about 12 hearts.
- Spread or pipe cream filling onto half of the hearts. Place another heart on top to create a sandwich. Chill in the refrigerator for 20 minutes to firm up.
4. Coat the Cakes:
- Melt the white chocolate or white candy melts in a microwave-safe bowl in 20-second intervals, stirring until smooth.
- Dip each heart cake into the melted chocolate, ensuring it’s fully coated. Place on a parchment-lined tray.
- Melt the pink or red candy melts and drizzle over the coated cakes for decoration.
5. Let Set and Serve:
- Allow the chocolate coating to set completely at room temperature or in the refrigerator before serving.
Notes
- Store the cakes in an airtight container in the refrigerator for up to 5 days.
- For a classic look, use a small piping bag to make delicate red drizzle designs on the cakes.
- To save time, use store-bought cake mix and frosting.

