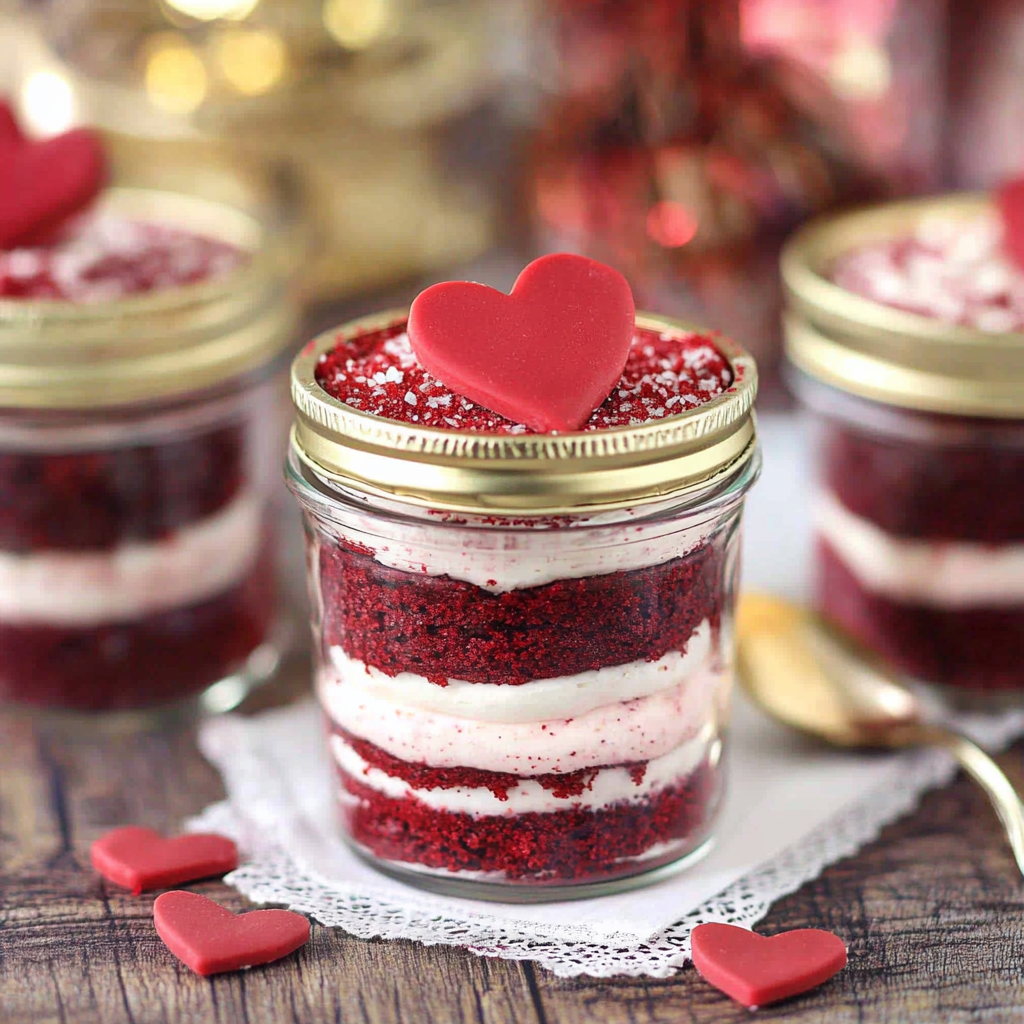
This Red Velvet Cake in a Jar is a fun, portable, and visually stunning dessert featuring layers of moist red velvet cake, creamy cream cheese frosting, and optional toppings like chocolate shavings or sprinkles. Perfect for parties, gifts, or an on-the-go treat, this dessert is easy to assemble and completely customizable!
Why You’ll Love This Recipe
- Portable & Mess-Free – Perfect for parties, picnics, or gifting.
- Rich & Creamy Layers – Classic red velvet cake paired with silky cream cheese frosting.
- Customizable & Fun – Add toppings like sprinkles, fruit, or chocolate drizzle.
- Make-Ahead Friendly – Stays fresh in the fridge for days.
- No Special Tools Required – Just bake, crumble, and layer in jars!
Ingredients
(Tip: You’ll find the full list of ingredients and measurements in the recipe card below.)
For the Red Velvet Cake:
- All-purpose flour
- Unsweetened cocoa powder
- Baking soda
- Salt
- Unsalted butter (softened)
- Granulated sugar
- Eggs
- Vanilla extract
- Buttermilk
- White vinegar
- Red food coloring
For the Cream Cheese Frosting:
- Cream cheese (softened)
- Unsalted butter (softened)
- Powdered sugar
- Vanilla extract
- Heavy cream (for extra creaminess)
For Garnish:
- Red velvet cake crumbs (for decoration)
- Chocolate shavings or chips
- Whipped cream
- Sprinkles
Directions

Step 1: Bake the Red Velvet Cake
- Preheat & Prepare Pans – Preheat oven to 350°F (175°C). Grease and line a baking sheet or 8-inch cake pan.
- Mix Dry Ingredients – In a bowl, whisk together flour, cocoa powder, baking soda, and salt.
- Cream Butter & Sugar – In a separate bowl, beat butter and sugar until light and fluffy.
- Add Eggs & Vanilla – Mix in eggs one at a time, followed by vanilla and red food coloring.
- Combine & Bake – Alternate adding dry ingredients and buttermilk. Stir in vinegar, then pour into the pan and bake for 18-22 minutes. Let cool completely.
Step 2: Make the Cream Cheese Frosting
- Beat the Butter & Cream Cheese – In a bowl, beat softened cream cheese and butter until smooth.
- Add Sugar & Vanilla – Gradually mix in powdered sugar, followed by vanilla and heavy cream. Beat until light and fluffy.
Step 3: Assemble the Jars
- Crumble the Cake – Once the cake is fully cooled, crumble it into small pieces.
- Layer the Cake & Frosting – In small jars, alternate layers of red velvet cake and cream cheese frosting. Repeat until the jar is full.
- Top with Garnish – Sprinkle cake crumbs, chocolate shavings, or whipped cream on top.
Step 4: Serve & Store
- Chill if Needed – Refrigerate for 30 minutes for the best flavor.
- Enjoy or Gift – Serve immediately or seal with a lid for later.
Servings and Timing
- Servings: 6-8 jars
- Prep Time: 20 minutes
- Cook Time: 20 minutes
- Chill Time: 30 minutes (optional)
Variations
- Strawberry Red Velvet Jars – Add fresh strawberries between the layers.
- Chocolate Ganache Drizzle – Pour warm chocolate ganache on top for extra indulgence.
- Oreo Red Velvet Jars – Mix crushed Oreos into the frosting for a cookies-and-cream twist.
- Gluten-Free Option – Use a gluten-free flour blend.
Storage/Reheating
- Refrigeration: Store in an airtight container for up to 4 days.
- Freezing: Freeze individual jars for up to 2 months. Thaw in the fridge before serving.
- Serving Tip: Enjoy chilled or let sit at room temperature for 10 minutes before eating.
FAQs
Can I use store-bought cake and frosting?
Yes! Using pre-made cake and frosting makes assembly even quicker.
What size jars should I use?
4 to 8-ounce mason jars work best for individual servings.
Can I make these ahead of time?
Yes! Assemble them a day in advance and store them in the fridge.
How do I prevent the cake from being dry?
Use buttermilk and avoid overbaking for a moist texture.
Can I make mini versions?
Yes! Use smaller jars for bite-sized desserts.
What’s the best way to decorate for a party?
Top with themed sprinkles, edible glitter, or piped frosting for an elegant touch.
Can I add a filling between the layers?
Absolutely! Try Nutella, caramel, or fruit preserves for extra flavor.
How do I transport these for a party?
Seal the jars with lids and place them in a box for easy transport.
Can I use different cake flavors?
Yes! Try vanilla, chocolate, or lemon cake for a fun twist.
How do I get smooth frosting layers?
Use a piping bag to evenly distribute the frosting between layers.
Conclusion
This Red Velvet Cake in a Jar is a delightful and portable dessert that’s perfect for any occasion. Whether you’re gifting them or enjoying them yourself, these mini cakes are an easy, delicious way to enjoy red velvet cake. Try this recipe today and enjoy the fun of layered cake in a jar!
PrintRed Velvet Cake in a Jar
This Red Velvet Cake in a Jar is a fun and portable dessert featuring layers of moist red velvet cake and luscious cream cheese frosting. Perfect for gifts, parties, or an easy-to-serve treat!
- Prep Time: 30 minutes
- Chill Time: 30 minutes
- Cook Time: 30 minutes
- Total Time: 1 hour 30 minutes
- Yield: 6–8 jars 1x
- Category: Dessert
- Method: Baking
- Cuisine: American
Ingredients
For the Red Velvet Cake:
- 2 ½ cups all-purpose flour
- 1 ½ cups granulated sugar
- 1 teaspoon baking soda
- 1 teaspoon cocoa powder
- 1 teaspoon salt
- 1 cup buttermilk (or 1 cup milk + 1 teaspoon vinegar)
- 1 cup vegetable oil
- 2 large eggs, room temperature
- 1 teaspoon vanilla extract
- 1 teaspoon white vinegar
- 2 tablespoons red food coloring
For the Cream Cheese Frosting:
- 8 oz (226g) cream cheese, softened
- ½ cup (1 stick) unsalted butter, softened
- 3 cups powdered sugar
- 1 teaspoon vanilla extract
For Assembly:
- 6–8 small mason jars (8 oz each)
- Crushed red velvet cake crumbs for garnish (optional)
Instructions
Step 1: Bake the Red Velvet Cake
- Preheat oven to 350°F (175°C). Grease and line a 9×13-inch baking pan with parchment paper.
- In a bowl, whisk together flour, sugar, baking soda, cocoa powder, and salt.
- In another bowl, whisk buttermilk, oil, eggs, vanilla, vinegar, and red food coloring.
- Gradually add dry ingredients to the wet ingredients, mixing until just combined.
- Pour batter into the prepared pan and bake for 25-30 minutes, or until a toothpick inserted in the center comes out clean.
- Let the cake cool completely before assembling.
Step 2: Make the Cream Cheese Frosting
- In a large bowl, beat cream cheese and butter until smooth.
- Add powdered sugar, one cup at a time, mixing well.
- Stir in vanilla extract and beat until fluffy.
Step 3: Assemble the Jars
- Use a round cookie cutter or a cup to cut circles of cake that fit into your mason jars.
- Place a cake layer at the bottom of each jar.
- Pipe or spoon a layer of cream cheese frosting on top.
- Repeat layers until the jar is full, finishing with a frosting layer.
- Sprinkle with cake crumbs or sprinkles for decoration.
Step 4: Chill & Serve
- Cover and refrigerate for at least 30 minutes before serving.
- Enjoy straight from the jar with a spoon!
Notes
- Make-Ahead: Store in the fridge for up to 5 days.
- No piping bag? Use a ziplock bag with the corner cut off.
- Gift Idea: Tie a ribbon around each jar for a cute presentation!

