
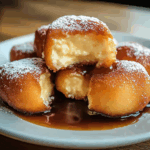
These Fried Cheesecake Bites are a decadent treat featuring rich, creamy cheesecake wrapped in a crispy, golden exterior. Perfect for parties, special occasions, or when you’re craving something indulgent, these bites are easy to make and irresistibly delicious.
Why You’ll Love This Recipe
Fried Cheesecake Bites offer the perfect balance of creamy and crunchy textures. They are quick to prepare, versatile for different toppings and fillings, and guaranteed to impress guests or satisfy late-night cravings. Whether served with a dusting of powdered sugar or a drizzle of chocolate sauce, these bites are pure dessert bliss.
Ingredients
(Tip: You’ll find the full list of ingredients and measurements in the recipe card below.)
- Cheesecake (store-bought or homemade)
- Flour tortillas
- Vegetable oil (for frying)
- Powdered sugar (for dusting)
- Optional: chocolate sauce, caramel sauce, or fruit preserves for dipping
Directions

- Cut the cheesecake into small bite-sized squares.
- Place a piece of cheesecake in the center of each flour tortilla.
- Fold and roll the tortilla around the cheesecake like a burrito, securing the edges with a little water if necessary.
- Heat the vegetable oil in a deep pan or fryer to 350°F (175°C).
- Fry the wrapped cheesecake bites in batches until golden brown and crispy, about 2-3 minutes.
- Remove from oil and drain on paper towels.
- Dust with powdered sugar and serve warm with optional dipping sauces.
Servings and timing
This recipe makes about 12-16 bites depending on the size you cut your cheesecake. Preparation takes around 15 minutes, and frying requires an additional 10 minutes. Overall, you’ll have delicious bites ready in about 25 minutes.
Variations
- Chocolate Coated: Dip the fried bites into melted chocolate for a richer flavor.
- Fruit Filled: Add a spoonful of fruit preserves inside the wrap with the cheesecake.
- Nutty Crunch: Sprinkle crushed nuts inside the tortilla before frying for extra texture.
- Cinnamon Sugar: Toss the hot bites in a cinnamon-sugar mixture instead of powdered sugar.
- Gluten-Free: Use gluten-free tortillas if needed.
Storage/Reheating
Store any leftover Fried Cheesecake Bites in an airtight container in the refrigerator for up to 3 days. To reheat, place them in an oven or air fryer at 350°F (175°C) for 5-7 minutes until crispy again. Microwaving is not recommended, as it will make the coating soggy.
FAQs
How do I keep the cheesecake bites from falling apart during frying?
Make sure the tortillas are tightly wrapped around the cheesecake and sealed with water. Fry in batches and avoid overcrowding the pan.
Can I use frozen cheesecake for this recipe?
Yes, slightly frozen cheesecake works even better because it holds its shape during wrapping and frying.
What type of oil is best for frying?
Use a neutral oil with a high smoke point like vegetable, canola, or peanut oil.
Can I air fry these instead of deep frying?
Yes, you can air fry them at 375°F for about 5-7 minutes or until golden and crispy.
What dipping sauces go well with Fried Cheesecake Bites?
Chocolate sauce, caramel sauce, raspberry preserves, or even honey are delicious options.
Can I prepare these in advance?
You can wrap the cheesecake bites ahead of time and refrigerate them for a few hours before frying.
Do I need to thaw frozen cheesecake before frying?
Partially thawed cheesecake is ideal because it is easier to handle and won’t melt too quickly during frying.
What kind of tortillas should I use?
Use regular flour tortillas; avoid corn tortillas as they tend to crack when rolled.
How do I make them extra crispy?
Ensure the oil is at the correct temperature and do not overcrowd the pan while frying.
Can I make mini versions for a party?
Absolutely! Cut smaller cheesecake squares and use small tortillas to create bite-sized party treats.
Conclusion
Fried Cheesecake Bites are a luxurious, crowd-pleasing dessert that combines the best of creamy cheesecake and crispy fried goodness. Simple to make and endlessly customizable, these little bites of heaven are perfect for any dessert table or special occasion. Try them once, and you’ll be hooked!
PrintFried Cheesecake Bites
Fried Cheesecake Bites are a deliciously decadent dessert featuring creamy cheesecake centers wrapped in a crispy, golden-brown exterior, perfect for parties or indulgent treats.
- Prep Time: 20 minutes
- Cook Time: 10 minutes
- Total Time: 30 minutes
- Yield: 12 bites 1x
- Category: Dessert
- Method: Frying
- Cuisine: American
- Diet: Vegetarian
Ingredients
- 8 oz cream cheese, softened
- 1/4 cup granulated sugar
- 1/2 tsp vanilla extract
- 1/2 cup graham cracker crumbs
- 12 egg roll wrappers
- Vegetable oil, for frying
- Powdered sugar, for dusting
- Chocolate or caramel sauce, for serving (optional)
Instructions
- In a bowl, mix cream cheese, sugar, and vanilla extract until smooth.
- Shape the mixture into small balls and roll each ball in graham cracker crumbs.
- Place each cheesecake ball in the center of an egg roll wrapper.
- Fold and roll the wrapper around the filling, sealing the edges with a little water.
- Heat vegetable oil in a deep fryer or heavy skillet to 350°F (175°C).
- Fry the wrapped cheesecake bites in batches until golden brown, about 2-3 minutes per side.
- Drain on paper towels and dust with powdered sugar.
- Serve warm with chocolate or caramel sauce if desired.
Notes
- Ensure the oil temperature remains consistent for even frying.
- Do not overcrowd the fryer to prevent the bites from sticking together.
- Freeze the cheesecake mixture for 15 minutes before wrapping for easier handling.
Nutrition
- Serving Size: 1 bite
- Calories: 160
- Sugar: 6g
- Sodium: 120mg
- Fat: 10g
- Saturated Fat: 4g
- Unsaturated Fat: 5g
- Trans Fat: 0g
- Carbohydrates: 15g
- Fiber: 0g
- Protein: 2g
- Cholesterol: 20mg