
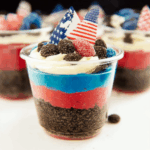
Red, White and Blue Dirt Cups are fun, festive layered desserts made with creamy pudding, crushed cookies, and colorful toppings that celebrate patriotic holidays like the Fourth of July, Memorial Day, and Labor Day. These individual no-bake treats are easy to assemble, family-friendly, and perfect for summer gatherings.
Why You’ll Love This Recipe
Red, White and Blue Dirt Cups are a playful spin on a classic kid-favorite treat, made holiday-ready with patriotic colors and layers. They’re simple, quick to make, and require no oven—ideal for hot summer days. Both kids and adults love the fun texture of crushed cookies layered with smooth pudding and whipped topping. They’re also easily customizable, making them great for parties, cookouts, and make-ahead desserts.
Ingredients
(Tip: You’ll find the full list of ingredients and measurements in the recipe card below.)
- Instant vanilla pudding mix
- Milk (cold)
- Whipped topping (like Cool Whip)
- Cream cheese (softened, optional for extra creaminess)
- Red and blue food coloring
- Golden Oreos or vanilla sandwich cookies (crushed)
- Red and blue sprinkles or patriotic candy decorations
- Clear plastic cups or jars for serving
Directions

- Make the pudding base:
- In a large bowl, whisk together the instant pudding mix and cold milk for 2 minutes until thickened.
- Fold in whipped topping and cream cheese (if using) until smooth and fluffy.
- Divide and color:
- Divide the pudding mixture into three portions. Leave one portion white, tint one red with food coloring, and tint the other blue.
- Assemble the cups:
- Start with a layer of crushed cookies at the bottom of each cup.
- Add a layer of red pudding, followed by another layer of cookie crumbs.
- Add a layer of white pudding, more crushed cookies, and then a layer of blue pudding.
- Top with more cookie crumbs and finish with red, white, and blue sprinkles or candies.
- Chill and serve:
- Refrigerate for at least 1 hour before serving to allow the layers to set.
Servings and timing
This recipe makes about 6–8 dirt cups (depending on cup size).
Prep time: 20 minutes
Chill time: 1 hour
Total time: About 1 hour 20 minutes
Variations
- Cream Cheese Layer: Add a cheesecake-like layer by mixing cream cheese and whipped topping separately.
- Berry Topping: Add fresh strawberries and blueberries for a natural red and blue touch.
- Chocolate Version: Use chocolate pudding and crushed chocolate sandwich cookies for a classic dirt cup base with patriotic toppings.
- Mini Cups: Use mini 2-ounce cups for bite-sized party treats.
- Layer Swirl: Mix colors for a marbled, tie-dye effect instead of defined layers.
storage/reheating
Store dirt cups covered in the refrigerator for up to 3 days.
Best served chilled.
Do not freeze, as the pudding and whipped topping may separate when thawed.
No reheating required—these are enjoyed cold.
FAQs
Can I make these dirt cups ahead of time?
Yes! They can be made 1–2 days in advance and stored covered in the refrigerator.
What kind of cookies should I use?
Golden Oreos, vanilla wafers, or any vanilla-flavored sandwich cookies work well.
Can I use homemade whipped cream?
Yes, just whip heavy cream with powdered sugar until stiff peaks form and use in place of whipped topping.
Are these dirt cups gluten-free?
Use gluten-free cookies and pudding mix to make them gluten-free.
Can I make these without food coloring?
Yes, leave the layers plain or use natural fruit (like strawberry puree and blueberry compote) for coloring.
Do I need to use cream cheese?
No, it’s optional. It adds richness and texture, but you can skip it for a lighter dessert.
Can I make these in a large trifle bowl?
Yes, just layer everything in a large clear bowl instead of individual cups.
Can kids help make these?
Absolutely! This is a fun and easy recipe that kids can help assemble and decorate.
How do I get clean, defined layers?
Spoon each layer carefully and use the back of a spoon to level it out for neat presentation.
Can I add gummy worms or candy?
Yes! Add gummy worms, chocolate stars, or patriotic M&M’s for extra fun.
Conclusion
Red, White and Blue Dirt Cups are a colorful, creamy, no-bake dessert that brings fun and flavor to any patriotic celebration. With easy layers of pudding, cookies, and festive toppings, they’re as simple to make as they are to enjoy. Perfect for entertaining, cookouts, or letting kids join in the kitchen, these dirt cups will be a summertime favorite for years to come.
PrintRed, White and Blue Dirt Cups
These festive Red, White and Blue Dirt Cups are a no-bake treat made with layers of crushed cookies, creamy pudding, and colorful whipped topping. They’re the perfect patriotic dessert for summer parties, BBQs, or holiday gatherings. Quick to make and fun to decorate!
- Total Time: 15 minutes
- Yield: 6 servings 1x
- Category: Dessert
- Method: No Bake/No Cook
- Cuisine: American
Ingredients
-
1 (3.4 oz) package instant vanilla pudding mix
-
2 cups cold milk
-
1 (8 oz) container whipped topping (like Cool Whip), thawed
-
12 vanilla sandwich cookies (like Golden Oreos), crushed
-
Red food coloring
-
Blue food coloring
-
½ cup fresh blueberries
-
½ cup chopped strawberries
-
Red, white, and blue sprinkles (optional)
-
Mini American flags or patriotic decorations (optional)
Instructions
-
In a mixing bowl, whisk together the pudding mix and cold milk for 2 minutes until thickened.
-
Gently fold in the thawed whipped topping until smooth and creamy.
-
Divide the mixture evenly into three bowls. Leave one plain (white), tint one with red food coloring, and the other with blue food coloring. Stir each until color is fully mixed.
-
In clear plastic cups or small dessert cups, start layering: begin with crushed cookies, then spoon in a layer of red pudding, more crushed cookies, a layer of white pudding, more cookies, and finish with blue pudding.
-
Top each cup with remaining cookie crumbs.
-
Garnish with chopped strawberries, blueberries, sprinkles, and decorative toppers if using.
-
Chill for at least 1 hour before serving.
Notes
-
You can use food-safe gel coloring for more vibrant layers.
-
Try using chocolate sandwich cookies if you prefer a richer flavor.
-
For a dairy-free version, use almond milk and dairy-free whipped topping.