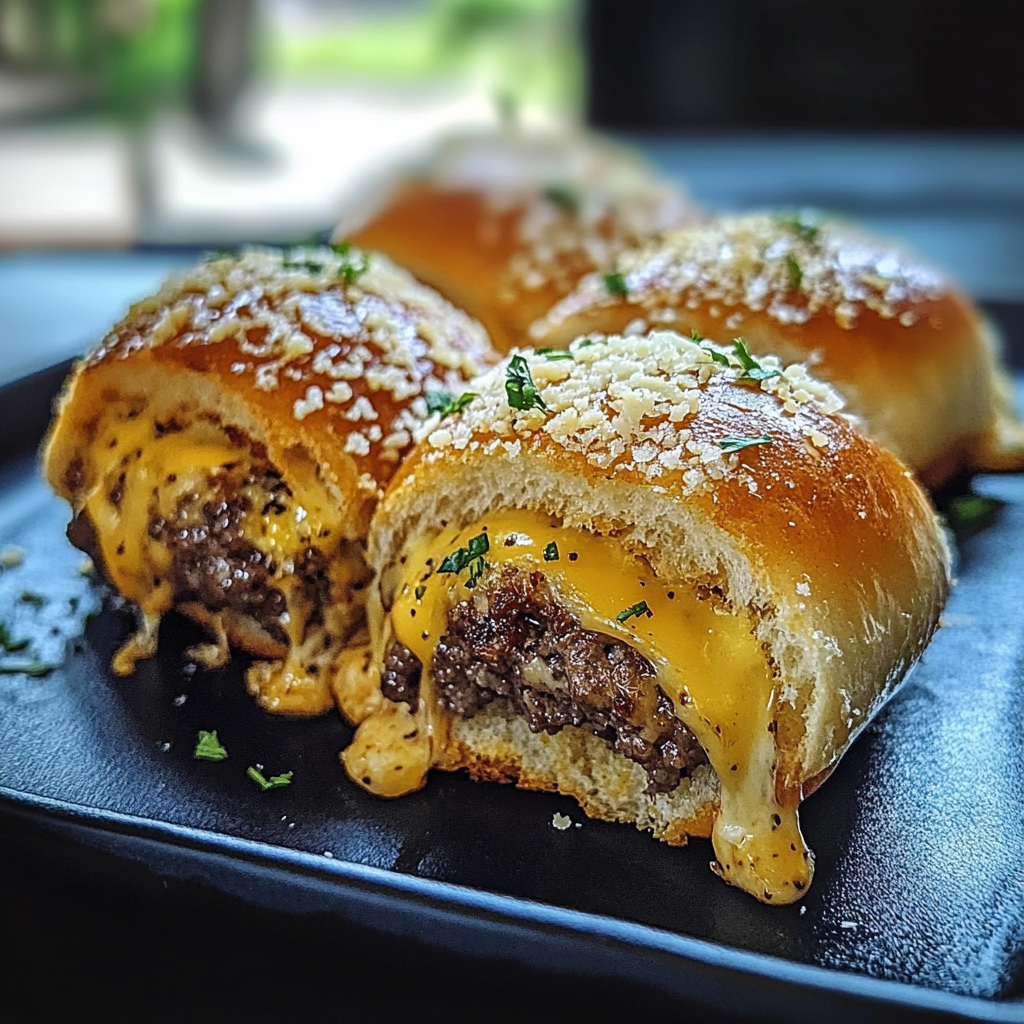
Are you looking for the perfect combination of comfort food and finger foods? Garlic Parmesan Cheeseburger Bombs are a mouthwatering snack that will become the star of your next gathering, game night, or family meal. These savory, cheesy bites are filled with seasoned beef, melty cheese, and topped with a rich garlic parmesan coating that will leave your taste buds craving more.
In this article, we’ll walk you through how to make these delicious cheeseburger bombs, as well as offer tips for serving and storing. Let’s dive into the recipe and get you on your way to creating this irresistible treat!
Ingredients for Garlic Parmesan Cheeseburger Bombs
To make these cheesy, garlicky bombs, you’ll need the following ingredients:
- 1 pound ground beef
- 1 package refrigerated biscuit dough (8 biscuits)
- 1 cup shredded cheddar cheese
- 1/4 cup grated Parmesan cheese
- 3 tablespoons melted butter
- 2 cloves garlic, minced
- 1 teaspoon garlic powder
- 1 teaspoon onion powder
- 1 tablespoon Worcestershire sauce
- Salt and pepper to taste
Instructions to Make Garlic Parmesan Cheeseburger Bombs

1. Preheat the Oven:
Preheat your oven to 375°F (190°C). Line a baking sheet with parchment paper or lightly grease it to prevent sticking.
2. Cook the Ground Beef:
In a large skillet, cook the ground beef over medium heat, breaking it up with a spatula as it cooks. Once the beef is browned and fully cooked, drain any excess grease. Stir in the Worcestershire sauce, garlic powder, onion powder, salt, and pepper. Remove from heat and set aside.
3. Prepare the Biscuit Dough:
Open the refrigerated biscuit dough and separate each biscuit. Use your hands to gently flatten each biscuit into a small round shape.
4. Add the Filling:
Spoon a small amount of the cooked ground beef mixture onto the center of each biscuit, then top with a generous amount of shredded cheddar cheese. Carefully fold the edges of the biscuit dough over the filling, sealing it completely.
5. Bake the Cheeseburger Bombs:
Place the sealed biscuit bombs onto your prepared baking sheet. Bake for 12-15 minutes, or until the biscuits are golden brown and cooked through.
6. Make the Garlic Parmesan Topping:
While the bombs are baking, mix together the melted butter, minced garlic, and grated Parmesan cheese in a small bowl. Once the bombs are finished baking, brush the garlic parmesan topping over the warm, golden biscuit bombs.
7. Serve and Enjoy:
Serve these garlic parmesan cheeseburger bombs hot out of the oven, perfect for dipping into your favorite sauces or enjoying on their own!
Tips for Serving Garlic Parmesan Cheeseburger Bombs
- Dipping Sauces: These cheeseburger bombs pair wonderfully with a variety of dipping sauces like ranch dressing, ketchup, or even a tangy barbecue sauce.
- Side Dishes: Serve them alongside a simple salad or fries for a complete meal.
- Make Ahead: You can prepare the cheeseburger bombs in advance and freeze them before baking. When you’re ready to enjoy, simply bake them from frozen, adding a few extra minutes to the baking time.
How to Store Garlic Parmesan Cheeseburger Bombs
- Refrigeration: Store any leftover cheeseburger bombs in an airtight container in the refrigerator for up to 3 days. To reheat, place them in the oven for 5-7 minutes at 350°F (175°C) to restore their crispy texture.
- Freezing: To freeze, place the baked bombs in a single layer on a baking sheet and freeze for about 1 hour. Then transfer the frozen bombs to an airtight container or freezer bag. You can bake them straight from the freezer when you’re ready to enjoy them.
Why You’ll Love Garlic Parmesan Cheeseburger Bombs
- Flavorful: The combination of seasoned beef, melty cheddar cheese, and a rich garlic parmesan coating makes these cheeseburger bombs an irresistible snack.
- Easy to Make: With just a few simple ingredients, this recipe comes together quickly, making it perfect for busy weeknights or entertaining guests.
- Versatile: These bombs can be customized with your favorite cheese or additional fillings, like bacon bits or pickles, for a more personalized touch.
Final Thoughts
Garlic Parmesan Cheeseburger Bombs are the ultimate comfort food with a twist! Whether you’re preparing them for a family dinner or a fun snack to share with friends, these cheesy, savory bombs will never disappoint. With their gooey cheese, seasoned beef, and garlic parmesan topping, they’re guaranteed to become a household favorite. Try them today and experience the magic of these easy, delicious bites!
Serving Tips for Garlic Parmesan Cheeseburger Bombs
- Dipping Sauces: These bombs pair wonderfully with a variety of sauces. Try classic ketchup, tangy mustard, creamy ranch, or even a smoky barbecue sauce. For an extra touch, you can also serve them with a spicy sriracha mayo or a cheesy dipping sauce.
- Perfect for Parties: These cheesy bites are ideal for gatherings, game nights, or tailgate parties. Serve them on a platter with toothpicks for easy handling, making them a fun finger food.
- Side Dishes: For a complete meal, serve garlic parmesan cheeseburger bombs with a fresh salad, roasted vegetables, or crispy French fries. You can even serve them with a side of coleslaw for a delicious contrast.
- Customizing Fillings: While this recipe uses classic cheeseburger ingredients, feel free to customize. Add crispy bacon bits, sautéed mushrooms, or pickles to the filling to give your bombs a personalized twist. You could also try different cheeses like mozzarella or pepper jack for a unique flavor.
Storage Tips for Garlic Parmesan Cheeseburger Bombs
- Refrigeration: If you have leftovers, store them in an airtight container in the refrigerator. They’ll stay fresh for up to 3 days. To reheat, place them in the oven at 350°F (175°C) for about 5-7 minutes or until they are warm and crispy again.
- Freezing: For longer storage, freeze the cheeseburger bombs. Place them on a baking sheet in a single layer and freeze for about 1 hour. Afterward, transfer them to a freezer-safe container or bag. When you’re ready to eat, bake them straight from frozen for 15-18 minutes at 375°F (190°C) until they are golden and heated through.
- Reheating in the Microwave: While the microwave can be used to reheat, it may make the biscuit dough softer. If you’re in a hurry, microwave for 20-30 seconds, but for the best texture, reheating in the oven is recommended.
- Meal Prep: Prepare the bombs ahead of time and keep the dough, beef filling, and garlic parmesan topping separate in the fridge for up to 1 day. When ready to serve, assemble and bake them for a quick, delicious snack or dinner.
With these tips, you can enjoy garlic parmesan cheeseburger bombs for days to come!
1. Can I use a different type of meat in this recipe?
Yes, you can substitute the ground beef with other meats like ground turkey, chicken, or even sausage. Just be sure to adjust the seasoning to complement the flavor of the meat you choose.
2. Can I make Garlic Parmesan Cheeseburger Bombs without biscuit dough?
Absolutely! If you prefer, you can use pizza dough, crescent roll dough, or even puff pastry as an alternative to biscuit dough. Each dough will provide a slightly different texture, but the flavor will still be amazing.
3. How can I make these cheeseburger bombs spicier?
For a spicier kick, you can add finely chopped jalapeños or red pepper flakes to the beef mixture. You could also use pepper jack cheese instead of cheddar for a flavorful heat boost.
4. Can I make these ahead of time for a party?
Yes! You can assemble the bombs in advance, cover them tightly with plastic wrap, and refrigerate them for up to 24 hours before baking. This makes them a great option for meal prep or party planning. Just pop them in the oven when you’re ready to serve!
Garlic Parmesan Cheeseburger Bombs
These Garlic Parmesan Cheeseburger Bombs are bite-sized bundles of joy, filled with juicy beef, gooey cheese, and wrapped in golden, buttery dough. Perfect as a snack, appetizer, or a fun dinner for the family!
- Prep Time: 15 minutes
- Cook Time: 20 minutes
- Total Time: 35 minutes
- Category: Appetizer, Snack, Main Dish
- Cuisine: American
Ingredients
Makes 12 bombs:
- For the filling:
- 1 lb (450 g) ground beef
- 1 small onion, finely diced
- 2 cloves garlic, minced
- 1 tablespoon ketchup
- 1 teaspoon mustard
- Salt and black pepper, to taste
- 12 small cubes of cheddar cheese or mozzarella
- For the dough:
- 1 (16 oz / 450 g) can refrigerated biscuit dough
- For the garlic butter topping:
- 1/4 cup (60 g) unsalted butter, melted
- 2 cloves garlic, minced
- 2 tablespoons grated Parmesan cheese
- 1 teaspoon dried parsley
Instructions
- Preheat the oven:
- Preheat your oven to 375°F (190°C). Line a baking sheet with parchment paper or a silicone baking mat.
- Cook the filling:
- In a skillet over medium heat, cook the ground beef and diced onion until the beef is browned and the onions are softened. Drain any excess grease.
- Stir in the minced garlic, ketchup, mustard, salt, and pepper. Cook for another 1-2 minutes. Remove from heat and let cool slightly.
- Prepare the dough:
- Separate the biscuit dough into individual pieces. Flatten each piece into a 4-inch circle.
- Assemble the bombs:
- Place a small spoonful of the beef mixture in the center of each dough circle. Add a cube of cheese on top.
- Fold the edges of the dough up and over the filling, pinching to seal completely. Shape into a smooth ball and place seam-side down on the prepared baking sheet.
- Make the garlic butter topping:
- In a small bowl, mix the melted butter, minced garlic, Parmesan cheese, and parsley.
- Bake:
- Brush the tops of the dough balls with the garlic butter mixture. Bake for 15-18 minutes, or until the bombs are golden brown and cooked through.
- Serve:
- Let cool for a few minutes before serving. Enjoy warm with dipping sauces like ketchup, ranch, or marinara.
Notes
- You can use pizza dough or crescent roll dough instead of biscuit dough.
- Add chopped pickles or bacon bits to the filling for extra flavor.
- Leftovers can be stored in an airtight container in the refrigerator for up to 3 days and reheated in the oven or air fryer.

