

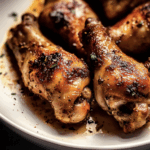
These Oven Baked Chicken Legs are juicy, flavorful, and coated in a perfectly seasoned crispy skin. Easy to prepare with simple spices and minimal prep time, this foolproof recipe delivers tender chicken every time. Ideal for weeknight dinners, meal prep, or backyard barbecues, these chicken legs are sure to become a family favorite.
Why You’ll Love This Recipe
- Crispy on the outside, juicy on the inside
- Quick and easy with minimal prep
- Uses simple pantry spices
- Versatile—perfect for any side dish or dipping sauce
- Great for meal prep or feeding a crowd
Ingredients
(Tip: You’ll find the full list of ingredients and measurements in the recipe card below.)
- 8 chicken legs (drumsticks), skin-on
- 2 tablespoons olive oil
- 1 teaspoon garlic powder
- 1 teaspoon onion powder
- 1 teaspoon smoked paprika (or regular paprika)
- 1 teaspoon Italian seasoning
- ½ teaspoon black pepper
- 1 teaspoon salt
- ½ teaspoon cayenne pepper (optional, for heat)
- Fresh parsley (optional, for garnish)
Directions

- Preheat the oven: Set your oven to 400°F (200°C) and line a baking sheet with parchment paper or foil. Place a wire rack on top for even cooking.
- Prepare the chicken legs: Pat the chicken legs dry with paper towels—this helps the skin get crispy.
- Season: In a large bowl, mix olive oil, garlic powder, onion powder, paprika, Italian seasoning, salt, black pepper, and cayenne (if using). Toss the chicken legs in the mixture until evenly coated.
- Arrange on the baking sheet: Place the seasoned chicken legs on the wire rack, leaving space between each piece.
- Bake: Bake for 35-45 minutes, flipping halfway through, until the internal temperature reaches 165°F (74°C) and the skin is crispy.
- Rest and serve: Let the chicken legs rest for 5 minutes before serving. Garnish with fresh parsley if desired.
Servings and Timing
- Servings: 4-6
- Prep time: 10 minutes
- Cook time: 40 minutes
- Total time: 50 minutes
Variations
- BBQ Chicken Legs: Brush with your favorite BBQ sauce during the last 10 minutes of baking.
- Lemon Herb Chicken Legs: Add lemon zest and fresh thyme for a bright, herbaceous twist.
- Spicy Chicken Legs: Add extra cayenne pepper or a dash of hot sauce before baking.
- Honey Garlic Glaze: Mix honey and minced garlic and brush it on the chicken during the last 10 minutes of cooking.
Storage/Reheating
- Store: Keep leftovers in an airtight container in the refrigerator for up to 4 days.
- Reheat: Reheat in the oven at 350°F (175°C) for 10-15 minutes or air fry at 375°F (190°C) for 5-7 minutes until crispy.
- Freeze: Store cooked chicken legs in a freezer-safe bag for up to 3 months. Thaw in the refrigerator before reheating.
FAQs
How do I get crispy skin on baked chicken legs?
Pat the chicken dry before seasoning and bake on a wire rack to allow air circulation, which helps the skin crisp up.
Can I use boneless chicken for this recipe?
Yes, but reduce the cooking time to 25-30 minutes since boneless pieces cook faster.
How do I know when the chicken legs are done?
Use a meat thermometer to ensure the internal temperature reaches 165°F (74°C) at the thickest part of the meat.
Can I marinate the chicken legs beforehand?
Yes, marinate the chicken in olive oil, lemon juice, and your favorite spices for 2-4 hours for extra flavor.
Should I cover chicken legs while baking?
No, leaving them uncovered helps the skin get crispy.
What sides pair well with baked chicken legs?
Serve with roasted vegetables, mashed potatoes, rice, or a fresh green salad for a complete meal.
Can I cook chicken legs from frozen?
Yes, increase the baking time to 50-60 minutes and check for doneness with a meat thermometer.
What’s the best way to season baked chicken legs?
A mix of garlic powder, paprika, salt, pepper, and herbs gives a balanced, flavorful seasoning.
Can I use a convection oven?
Yes, reduce the baking temperature to 375°F (190°C) and cook for 30-35 minutes, checking for crispness and doneness.
How do I keep the chicken juicy?
Don’t overbake—use a meat thermometer to check for doneness and let the chicken rest before serving to retain juices.
Conclusion
These Oven Baked Chicken Legs are easy to prepare, packed with flavor, and perfect for any occasion. Whether you’re serving them as a weeknight dinner or adding them to your meal prep rotation, this crispy, juicy chicken recipe will quickly become a family favorite. Pair with your favorite sides and sauces for a complete and satisfying meal!
PrintOven Baked Chicken Legs Recipe
These oven baked chicken legs are crispy on the outside, juicy on the inside, and packed with flavor. Perfect for a quick weeknight dinner or a casual family meal, this recipe is easy to make with just a few pantry staples.
- Prep Time: 10 minutes
- Cook Time: 45 minutes
- Total Time: 55 minutes
- Yield: 4 servings 1x
- Category: Dinner
- Method: Baking
- Cuisine: American
Ingredients
-
8 chicken drumsticks (about 2 lbs)
-
2 tbsp olive oil
-
1 tsp salt
-
½ tsp black pepper
-
1 tsp garlic powder
-
1 tsp onion powder
-
1 tsp smoked paprika
-
½ tsp dried thyme (optional)
Instructions
-
Preheat your oven to 425°F (220°C).
-
Line a baking sheet with foil and place a wire rack on top.
-
Pat the chicken legs dry with paper towels.
-
In a large bowl, toss the chicken with olive oil, salt, pepper, garlic powder, onion powder, paprika, and thyme.
-
Arrange the chicken legs on the wire rack, leaving space between each piece.
-
Bake for 40–45 minutes, flipping halfway through, until the skin is golden and crispy and the internal temperature reaches 165°F (74°C).
-
Let rest for 5 minutes before serving.
Notes
-
For extra crispy skin, broil the chicken for 2–3 minutes at the end of cooking.
-
You can use drumsticks with or without skin, but skin-on gives the best crispy texture.
-
Add a squeeze of lemon juice or a sprinkle of fresh herbs before serving for extra flavor.