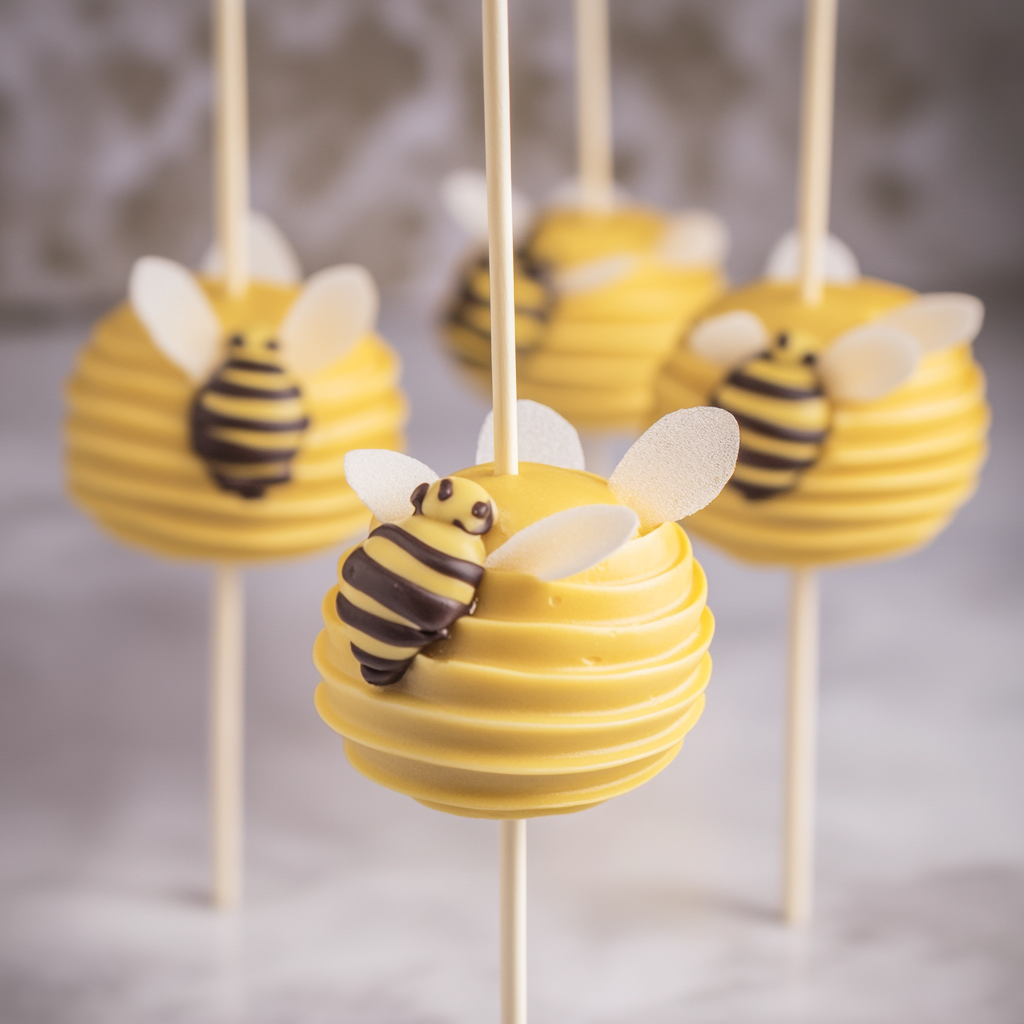
Bee Cake Pops are an adorable and sweet treat that’s perfect for parties, baby showers, or springtime celebrations. These delightful cake pops are made with moist cake crumbs, creamy frosting, and a candy coating decorated to resemble cute little bees. They’re fun to make and guaranteed to impress!
Why You’ll Love This Recipe
- Cute and Creative: Bee-themed decorations make these cake pops irresistible.
- Fun to Make: Great for a baking project with kids or a festive event.
- Customizable: Choose your favorite cake flavor and colors for a personal touch.
- Perfect for Any Occasion: Ideal for birthdays, themed parties, or as a gift.
Ingredients
(Tip: You’ll find the full list of ingredients and measurements in the recipe card below.)
For the Cake Pops:
- Cake (homemade or store-bought, any flavor)
- Frosting (buttercream or cream cheese)
For Decoration:
- Yellow candy melts
- Black candy melts or melted chocolate
- White candy melts (for wings)
- Candy eyes
- Lollipop sticks
Optional: Edible glitter or sprinkles for added flair.
Directions

Make the Cake Pops:
- Prepare the Cake:
- Crumble the cooled cake into fine crumbs in a large bowl.
- Add Frosting:
- Mix in frosting, 1 tablespoon at a time, until the mixture holds together when pressed.
- Shape the Cake Balls:
- Roll the mixture into small balls and place them on a baking sheet lined with parchment paper. Chill in the fridge for at least 30 minutes.
Assemble and Decorate:
- Melt the Candy Coating:
- Melt the yellow candy melts in a microwave-safe bowl in 30-second intervals, stirring after each interval, until smooth.
- Attach the Sticks:
- Dip the tip of each lollipop stick into the melted yellow candy coating, then insert it halfway into a cake ball. Allow the coating to set to secure the stick.
- Coat the Cake Pops:
- Dip each cake pop into the melted yellow candy coating, ensuring it’s fully covered. Gently tap off excess coating and stand the cake pops upright in a styrofoam block or cake pop stand to dry.
- Add Stripes and Eyes:
- Melt the black candy melts or chocolate and use a piping bag or toothpick to draw stripes around the cake pops. Attach candy eyes with a dab of melted chocolate.
- Create Wings:
- Melt the white candy melts and pipe small oval shapes onto parchment paper to resemble wings. Let them harden, then attach to the sides of the cake pops with melted chocolate.
- Finish and Serve:
- Let the cake pops set completely. Serve or package them in treat bags for gifting.
Servings and Timing
- Servings: Makes about 12-16 cake pops
- Prep Time: 30 minutes
- Chill Time: 30 minutes
- Decoration Time: 30 minutes
- Total Time: 1 hour 30 minutes
Variations
- Flavored Cake: Use chocolate, vanilla, or lemon cake for variety.
- Colorful Bees: Experiment with different candy melt colors for a whimsical touch.
- Nut-Free: Ensure all decorations and frosting are nut-free if needed.
- Vegan Option: Use a vegan cake and frosting with dairy-free candy melts.
Storage
- Room Temperature: Store in an airtight container for up to 2 days.
- Refrigeration: Keep in the fridge for up to 1 week.
- Freezing: Freeze undecorated cake balls for up to 2 months. Thaw and decorate when ready to serve.
FAQs
1. Can I use store-bought cake and frosting?
Yes! Store-bought cake and frosting work perfectly for a quick and easy option.
2. How do I prevent cake pops from falling off the sticks?
Ensure the cake mixture is firm and chill the pops after inserting the sticks to help them hold.
3. What if my candy melts are too thick?
Thin the melted candy coating with a small amount of vegetable oil or shortening for smoother dipping.
4. Can I make these in advance?
Yes, you can make the cake pops a day ahead and store them in the fridge until ready to serve.
5. How do I make the decorations neater?
Use piping bags with fine tips for more precise stripes and designs.
6. Can I use white chocolate instead of candy melts?
Yes, but white chocolate should be tempered for best results.
7. What can I use instead of candy eyes?
Draw eyes with melted chocolate or use tiny white and dark chocolate chips.
8. How do I attach the wings securely?
Use a small dab of melted candy coating as edible “glue.”
9. Can I make mini cake pops?
Absolutely! Roll smaller balls for bite-sized bee cake pops.
10. Can I add flavor to the candy coating?
Yes, use candy oil flavors, but avoid water-based extracts as they can seize the coating.
Conclusion
Bee Cake Pops are a delightful and creative dessert that’s sure to bring smiles to any occasion. With their adorable decorations and sweet flavor, they’re perfect for kids’ parties, themed celebrations, or as a thoughtful homemade gift. Try them today and buzz into the fun of baking these charming treats!
PrintBee Cake Pops
These adorable bee cake pops are a fun and sweet treat that’s perfect for parties, spring celebrations, or anytime you want to impress! Moist cake crumbs are shaped into balls, dipped in yellow chocolate, and decorated to look like cute little bees.
- Prep Time: 20 minutes
- Chill Time: 1 hour
- Cook Time: 30 minutes
- Total Time: 1 hour 50 minutes
- Yield: 20–24 cake pops 1x
- Category: Dessert, Party Treat
- Method: No-Bake
- Cuisine: American
Ingredients
For the Cake Pops:
- 1 box cake mix (any flavor, baked according to package instructions)
- 1/3 cup frosting (vanilla or cream cheese works best)
For the Decoration:
- 2 cups yellow candy melts
- 1/4 cup black candy melts or black icing
- 1/4 cup white candy melts (for wings)
- Edible candy eyes
- Lollipop sticks
Instructions
- Prepare the Cake Crumbs:
- Bake the cake according to the package instructions. Let it cool completely.
- Crumble the cake into fine crumbs in a large bowl.
- Mix the Cake Pop Dough:
- Add the frosting to the cake crumbs, a little at a time, and mix until the dough holds together when pressed but is not sticky.
- Shape the Cake Pops:
- Roll the mixture into small balls, about 1 inch in diameter, and place them on a baking sheet lined with parchment paper.
- Chill in the refrigerator for 1–2 hours or freeze for 20–30 minutes.
- Melt the Candy Coating:
- Melt the yellow candy melts in a microwave-safe bowl in 30-second intervals, stirring after each, until smooth.
- Insert the Sticks:
- Dip the tip of each lollipop stick into the melted yellow candy and insert it halfway into each cake ball. Allow the coating to set for a few minutes.
- Coat the Cake Pops:
- Dip each cake pop into the yellow candy melts, ensuring it’s fully coated. Gently tap off the excess and place them upright in a styrofoam block or cake pop stand to dry.
- Decorate the Bee Pops:
- Use melted black candy melts or black icing to pipe stripes around the cake pops for the bee body. Attach candy eyes with a small dab of melted candy.
- For wings, pipe small ovals of white candy melts onto parchment paper, let them harden, and attach them to the top of the cake pops using melted candy melts.
- Serve:
- Once all decorations are set, arrange the bee cake pops in a stand or a decorative display. Enjoy!
Notes
- Store cake pops in an airtight container at room temperature for up to 3 days or in the refrigerator for up to 1 week.
- For additional details, use a food-safe marker to draw smiles or antennae.
- If the candy melts are too thick, add a teaspoon of coconut oil or vegetable shortening to thin them out.

