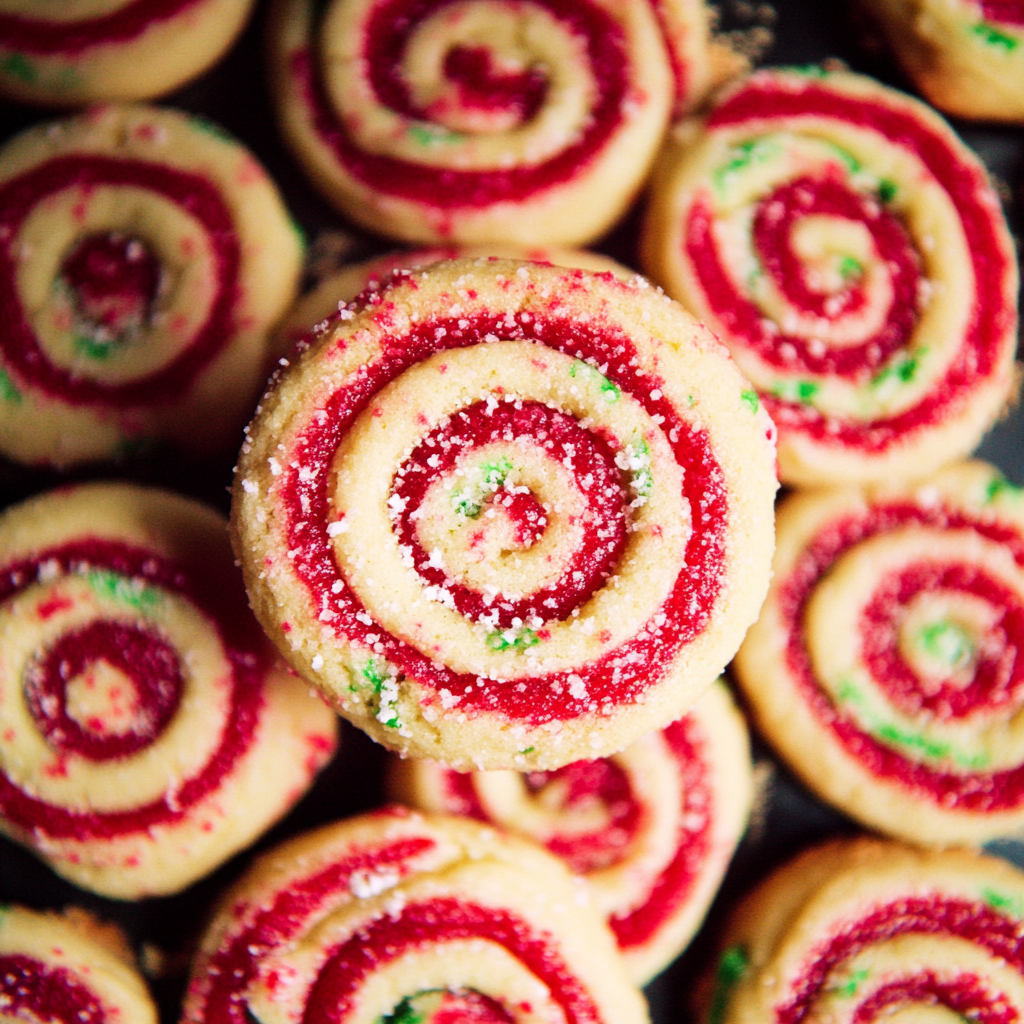
Christmas Pinwheel Cookies are a festive and colorful treat that add a cheerful touch to any holiday dessert table. These buttery cookies, with their signature spiral design, are as fun to make as they are to eat. With endless color and flavor combinations, they’re the perfect addition to your holiday baking tradition.
Why You’ll Love This Recipe
- Visually stunning: The spiral design and bright colors make these cookies a standout dessert.
- Customizable: Change the colors, flavors, or add sprinkles for a personalized touch.
- Make-ahead friendly: Prepare the dough in advance and bake when needed.
- Crowd-pleaser: Kids and adults alike will love these festive cookies.
Ingredients
(Tip: You’ll find the full list of ingredients and measurements in the recipe card below.)
- All-purpose flour
- Baking powder
- Salt
- Unsalted butter, softened
- Granulated sugar
- Egg
- Vanilla extract
- Food coloring (red and green for Christmas colors)
- Sprinkles (optional, for rolling)
Directions

- Prepare the dry ingredients:
- In a bowl, whisk together the flour, baking powder, and salt. Set aside.
- Cream the butter and sugar:
- In a large bowl, beat the softened butter and sugar until light and fluffy.
- Add the egg and vanilla:
- Mix in the egg and vanilla extract until fully combined.
- Incorporate the dry ingredients:
- Gradually add the dry ingredients to the wet mixture, mixing until a soft dough forms.
- Divide and color the dough:
- Split the dough into two equal portions. Add red food coloring to one portion and green food coloring to the other, kneading until the color is evenly distributed.
- Roll out the dough:
- Roll each portion of dough between sheets of parchment paper into a rectangle of equal size (about ¼-inch thick).
- Layer and roll:
- Place one rectangle of dough on top of the other. Gently roll the layered dough into a tight log, starting from the long side.
- Chill the dough:
- Wrap the log in plastic wrap and refrigerate for at least 2 hours, or until firm.
- Slice and bake:
- Preheat the oven to 350°F (175°C). Slice the chilled dough into ¼-inch thick rounds and place them on a parchment-lined baking sheet. Bake for 10–12 minutes, or until the edges are set but not browned.
- Cool and serve:
- Let the cookies cool on the baking sheet for 5 minutes before transferring to a wire rack to cool completely.
Servings and Timing
- Yield: About 24 cookies
- Preparation time: 30 minutes
- Chilling time: 2 hours
- Baking time: 10–12 minutes
- Total time: 2 hours 40 minutes – 2 hours 42 minutes
Variations
- Flavor options: Add peppermint, almond, or citrus extract to the dough for a festive twist.
- Alternative colors: Use blue and white for a winter wonderland theme or gold and silver for New Year’s.
- Sprinkle border: Roll the dough log in holiday sprinkles before slicing for extra flair.
- Chocolate swirl: Replace one layer of dough with a cocoa-flavored dough for a chocolate pinwheel.
- Gluten-free: Substitute with a 1:1 gluten-free flour blend.
Storage/Reheating
- Storage: Store the cookies in an airtight container at room temperature for up to 1 week.
- Freezing: Freeze the dough log or baked cookies in a freezer-safe bag for up to 2 months. Thaw before baking or serving.
- Reheating: These cookies don’t require reheating and are best served at room temperature.
FAQs
1. Can I use gel food coloring?
Yes, gel food coloring works well and produces vibrant colors without altering the dough’s texture.
2. How do I prevent the dough from cracking?
Ensure the dough is chilled but not overly firm when rolling and slicing.
3. Can I make these cookies ahead of time?
Absolutely! Prepare and chill the dough up to 3 days in advance, or freeze it for later use.
4. What if the layers don’t stick together?
Lightly brush one layer with water before placing the second layer on top to help them adhere.
5. Can I make mini pinwheels?
Yes, roll the dough into smaller rectangles and slice thinner rounds for mini cookies.
6. How do I get even slices?
Use a sharp knife and rotate the dough log slightly after each cut to maintain its shape.
7. Can I skip the sprinkles?
Yes, the cookies are still festive without the sprinkles.
8. What’s the best way to store the dough?
Wrap the dough log tightly in plastic wrap to prevent it from drying out.
9. Can I bake multiple trays at once?
Yes, but rotate the trays halfway through baking for even cooking.
10. Can I use pre-made sugar cookie dough?
Yes, but homemade dough gives better flavor and texture.
Conclusion
Christmas Pinwheel Cookies are a delightful way to add a pop of color and holiday cheer to your dessert spread. With their buttery flavor and festive design, they’re as fun to make as they are to eat. Whether for a cookie exchange, a holiday party, or a treat for Santa, these cookies are sure to impress and spread holiday joy!
PrintChristmas Pinwheel Cookies
Christmas Pinwheel Cookies are a colorful and festive addition to any holiday dessert table. These buttery, swirl-patterned cookies are as fun to make as they are to eat, with vibrant red, green, and vanilla layers that bring holiday cheer to every bite.
- Prep Time: 30 minutes
- Chill Time: 1 hour 30 minutes
- Cook Time: 12 minutes
- Total Time: 2 hours 12 minutes
- Yield: 24 cookies 1x
- Category: Dessert
- Method: Baking
- Cuisine: American
Ingredients
- 2 ½ cups all-purpose flour
- ½ teaspoon baking powder
- ¼ teaspoon salt
- ¾ cup unsalted butter, softened
- 1 cup granulated sugar
- 1 large egg
- 2 teaspoons vanilla extract
- Red and green gel food coloring
- Sprinkles (optional, for rolling)
Instructions
- Prepare the Dough:
- In a medium bowl, whisk together the flour, baking powder, and salt. Set aside.
- In a large bowl, cream the butter and sugar together until light and fluffy. Beat in the egg and vanilla extract.
- Gradually add the dry ingredients to the wet ingredients, mixing until just combined.
- Divide and Color the Dough:
- Divide the dough into three equal portions.
- Leave one portion plain. Add red gel food coloring to the second portion and green gel food coloring to the third. Mix each portion until the color is evenly distributed.
- Roll and Stack the Dough:
- Roll each portion of dough into a flat rectangle (about ¼-inch thick) between sheets of parchment paper.
- Chill the dough sheets in the refrigerator for 30 minutes to make them easier to handle.
- Once chilled, stack the dough rectangles on top of each other, starting with the plain dough, followed by the red, then the green. Trim the edges to align the layers if needed.
- Roll into a Log:
- Using the parchment paper for support, carefully roll the stacked dough layers into a tight log, starting from one long edge. Chill the log for 1 hour or until firm.
- Slice and Bake:
- Preheat your oven to 350°F (175°C). Line baking sheets with parchment paper.
- Slice the dough log into ¼-inch thick rounds and place them on the prepared baking sheets, spaced about 2 inches apart.
- Bake for 10–12 minutes, or until the edges are set but not browned. Let cool on the baking sheets for 5 minutes before transferring to a wire rack.
- Optional Decoration:
- Roll the dough log in sprinkles before slicing for a fun, festive border around the cookies.
Notes
- For easier handling, work with small batches of dough while rolling and stacking.
- Store baked cookies in an airtight container at room temperature for up to 1 week or freeze for up to 3 months.
- Experiment with other colors or add peppermint extract for a holiday twist!

