
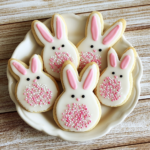
Easter Bunny Sugar Cookies are adorable and delicious cookies decorated to look like cute bunnies, perfect for Easter celebrations. These buttery sugar cookies are easy to make, hold their shape well, and are a fun baking project for kids and adults alike. Decorate them with royal icing, candy, or sprinkles to create charming treats that are sure to bring smiles to everyone at your Easter gathering.
Why You’ll Love This Recipe
- Fun and festive: Ideal for Easter parties and celebrations.
- Easy to make: Simple sugar cookie recipe with straightforward decorating techniques.
- Great for kids: Decorating cookies is a fun and creative activity for all ages.
- Customizable: Use your favorite colors, candies, and sprinkles.
- Perfect for gifting: Make a sweet and thoughtful homemade gift.
Ingredients
(Tip: You’ll find the full list of ingredients and measurements in the recipe card below.)
For the Sugar Cookies
- 2 ½ cups all-purpose flour
- 1 cup unsalted butter, softened
- 1 cup granulated sugar
- 1 large egg
- 1 teaspoon vanilla extract
- ½ teaspoon almond extract (optional)
- 1 teaspoon baking powder
- ½ teaspoon salt
For the Royal Icing
- 2 cups powdered sugar, sifted
- 2-3 tablespoons milk or water
- 1 tablespoon light corn syrup
- 1 teaspoon vanilla extract
- Food coloring (in pastel shades)
Optional Decorations
- Pink and white candy melts
- Mini marshmallows (for bunny tails)
- Pink and black edible markers (for faces)
- Sprinkles and candy eyes
Directions

Make the Sugar Cookie Dough
- Mix Dry Ingredients: In a medium bowl, combine flour, baking powder, and salt. Set aside.
- Cream Butter and Sugar: In a large bowl, beat the softened butter and granulated sugar until light and fluffy.
- Add Wet Ingredients: Mix in the egg, vanilla extract, and almond extract (if using) until well combined.
- Combine Ingredients: Gradually add the dry ingredients to the wet mixture. Mix until a soft dough forms.
- Chill the Dough: Divide the dough into two disks, wrap in plastic wrap, and refrigerate for at least 1 hour (or up to 24 hours).
Roll and Cut the Cookies
- Preheat Oven: Preheat your oven to 350°F (175°C). Line baking sheets with parchment paper.
- Roll Out Dough: On a lightly floured surface, roll out the dough to about ¼ inch thickness.
- Cut Into Shapes: Use a bunny-shaped cookie cutter to cut out cookies. Place on the prepared baking sheets about 1 inch apart.
Bake the Cookies
- Bake: Bake for 8-10 minutes or until the edges are lightly golden.
- Cool: Allow the cookies to cool on the baking sheet for 5 minutes, then transfer to a wire rack to cool completely before decorating.
Make the Royal Icing
- Mix Icing: In a bowl, whisk together powdered sugar, milk, corn syrup, and vanilla extract until smooth. The icing should be thick but still flow smoothly. Adjust the consistency with more milk or powdered sugar as needed.
- Color the Icing: Divide the icing into separate bowls and add food coloring to achieve your desired pastel shades.
Decorate the Cookies
- Base Coat: Use a piping bag or squeeze bottle to outline the bunny shapes with royal icing. Flood the center of the cookies with icing and use a toothpick to fill in any gaps.
- Create Bunny Faces: Use pink icing or candy melts for the bunny ears and nose. Draw eyes and whiskers with black edible markers or pipe them on with icing.
- Add Bunny Tails: Attach mini marshmallows to the back of the cookies using a dab of icing to create fluffy bunny tails.
- Set the Icing: Allow the cookies to dry completely before stacking or serving.
Serve
- Display and Enjoy: Arrange the decorated cookies on a platter for a festive presentation.
Servings and Timing
- Servings: 24 cookies (depending on size)
- Prep Time: 30 minutes (plus 1 hour chilling)
- Cook Time: 10 minutes
- Additional Time: 30 minutes (for decorating)
- Total Time: 2 hours 10 minutes
Variations
- Chocolate Bunny Cookies: Add ¼ cup of cocoa powder to the cookie dough for a chocolatey twist.
- Gluten-Free Option: Use a gluten-free all-purpose flour blend instead of regular flour.
- Sparkly Bunnies: Add edible glitter or sugar crystals for a fun sparkle effect.
- Flavor Twist: Swap vanilla extract for lemon or almond extract for a different flavor profile.
- Mini Bunny Cookies: Make smaller bite-sized versions using mini cookie cutters.
Storage/Reheating
- Storage: Store decorated cookies in an airtight container at room temperature for up to 1 week.
- Freezing: Freeze undecorated cookies in a freezer-safe bag for up to 2 months. Thaw and decorate as needed.
- Make-Ahead Tip: Prepare the dough and freeze it for up to 3 months. Thaw overnight in the refrigerator before rolling and baking.
FAQs
How do I keep my cookies from spreading?
Chill the dough thoroughly before rolling and baking. You can also refrigerate the cut-out cookies for 10 minutes before baking.
Can I use store-bought cookie dough?
Yes, you can use refrigerated sugar cookie dough as a time-saving option.
How do I get smooth icing on the cookies?
For a smooth finish, use a piping bag or squeeze bottle and allow the icing to flow naturally. Tap the cookie gently to settle the icing.
Can I make this recipe without a bunny-shaped cookie cutter?
Yes, you can shape the dough into bunny shapes using a knife or make round cookies and decorate them to look like bunny faces.
What if my icing is too runny?
Add more powdered sugar to thicken the icing or let it sit for a few minutes to firm up.
Can I use natural food coloring?
Yes, natural food colorings made from fruits, vegetables, or plant extracts work well for a pastel effect.
How do I prevent the icing from smudging?
Allow the icing to dry completely before stacking or packaging the cookies.
Can I use royal icing for detailed designs?
Yes, royal icing is perfect for intricate designs and dries with a firm, glossy finish.
How do I store decorated cookies without damaging them?
Layer cookies between sheets of wax or parchment paper in an airtight container.
Are these cookies good for gifting?
Absolutely! Pack the cookies in decorative bags or boxes for a beautiful homemade gift.
Conclusion
Easter Bunny Sugar Cookies are a charming and delicious way to celebrate the holiday. These sweet and buttery cookies are as fun to make as they are to eat, offering a perfect opportunity for creativity in the kitchen. Whether you’re baking with kids, preparing treats for a party, or making special gifts, these cookies will bring a touch of whimsy and joy to your Easter celebrations. Hop into the kitchen and enjoy making these delightful cookies!
PrintEaster Bunny Sugar Cookies
These adorable Easter Bunny Sugar Cookies are buttery, soft, and fun to decorate! Shaped like cute bunnies and topped with colorful icing, these cookies are perfect for spring celebrations, Easter parties, and a delightful baking activity with kids.
- Prep Time: 30 minutes
- Chill Time: 1 hour
- Cook Time: 30 minutes
- Total Time: 1 hour 30 minutes
- Yield: 24 cookies 1x
- Category: Dessert, Snack
- Method: Baking
- Cuisine: American
Ingredients
For the Cookies:
- 2 1/2 cups all-purpose flour
- 1 teaspoon baking powder
- 1/2 teaspoon salt
- 1 cup unsalted butter, softened
- 1 cup granulated sugar
- 1 large egg
- 1 teaspoon vanilla extract
- 1/2 teaspoon almond extract (optional)
For the Royal Icing:
- 2 cups powdered sugar
- 2 tablespoons meringue powder
- 4–6 tablespoons water
- Gel food coloring (pink, white, and pastel shades)
For Decoration:
- Small candy eyes or chocolate chips
- Mini marshmallows (for bunny tails)
- Pink sugar crystals or sprinkles
Instructions
-
Prepare the Dough:
In a bowl, whisk together flour, baking powder, and salt. Set aside. -
Mix Wet Ingredients:
In a large bowl, beat butter and sugar together until light and fluffy. Add egg, vanilla extract, and almond extract, mixing well. -
Combine and Chill:
Gradually mix in the dry ingredients until a soft dough forms. Divide dough into two discs, wrap in plastic wrap, and chill in the refrigerator for at least 1 hour. -
Preheat the Oven:
Preheat your oven to 350°F (175°C). Line baking sheets with parchment paper. -
Shape and Bake:
Roll out the dough on a floured surface to about 1/4-inch thickness. Use a bunny-shaped cookie cutter to cut out cookies. Place them on the prepared baking sheets about 1 inch apart. -
Bake the Cookies:
Bake for 8-10 minutes or until the edges are lightly golden. Let the cookies cool completely on a wire rack before decorating. -
Make the Royal Icing:
Whisk together powdered sugar, meringue powder, and 4 tablespoons of water until smooth. Add more water, a teaspoon at a time, until the icing is thick but pipeable. Divide icing into bowls and tint with food coloring. -
Decorate the Cookies:
- Base Layer: Pipe white icing to cover the bunny shape and let it set.
- Add Details: Use pink icing for the bunny ears and nose. Attach candy eyes or pipe with chocolate.
- Bunny Tails: Add a mini marshmallow with a dab of icing to the back of the bunny for a fluffy tail.
- Optional: Sprinkle pink sugar on the ears for extra sparkle.
-
Set the Icing:
Let the decorated cookies sit at room temperature for 1-2 hours until the icing is fully set.
Notes
- Store cookies in an airtight container at room temperature for up to 5 days.
- For a shortcut, use store-bought cookie icing or edible markers for decorating.
- These cookies also make great gifts when packaged in clear bags with festive ribbons.