
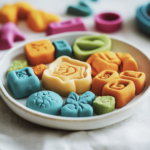
This Homemade Modeling Clay is soft, easy to mold, and dries beautifully, making it perfect for crafts, kids’ projects, and DIY decorations. With just a few simple ingredients, you can create a non-toxic, homemade clay that’s great for sculpting, air-drying, or baking.
Why You’ll Love This Recipe
- Simple ingredients – Uses pantry staples like flour, salt, and water.
- Non-toxic & kid-friendly – Safe for little hands!
- Customizable – Add colors, scents, or glitter for extra fun.
- Air-dry or bake – Choose how you want to harden the clay.
- Budget-friendly – Cheaper than store-bought modeling clay.
Ingredients
(Tip: You’ll find the full list of ingredients and measurements in the recipe card below.)
Basic Salt Dough Clay:
- 2 cups all-purpose flour
- 1 cup salt
- ¾ cup warm water
- 1 tbsp vegetable oil (for extra smoothness)
Soft Baking Soda Clay:
- 1 cup baking soda
- ½ cup cornstarch
- ¾ cup water
Optional Add-Ins:
- Food coloring (for colored clay)
- Essential oils (for scented clay)
- Glitter (for sparkle)
Directions

Salt Dough Clay (Best for Air-Drying)
- In a bowl, mix flour and salt.
- Add warm water and oil, stirring until dough forms.
- Knead for 5 minutes until smooth.
- Use immediately or store in an airtight container.
Baking Soda Clay (Best for Baking & Painting)
- In a saucepan, mix baking soda, cornstarch, and water.
- Heat over medium heat, stirring constantly until thick like mashed potatoes.
- Remove from heat and let cool for 5 minutes.
- Knead until smooth.
Shaping & Drying
- Air-Dry Method: Let clay creations dry for 24-48 hours.
- Baking Method (for salt dough): Bake at 200°F (93°C) for 1-2 hours, checking for hardness.
Decorating
- Paint dried clay with acrylic paint.
- Seal with Mod Podge or clear varnish for durability.
Storage
- Uncooked Clay: Store in an airtight container in the fridge for up to 1 week.
- Dried Clay: Keep in a cool, dry place to prevent cracking.
FAQs
Can I make colored clay?
Yes! Add food coloring to the water before mixing.
How do I prevent cracking?
- Knead the clay well.
- Air-dry slowly—don’t use high heat.
Can I bake baking soda clay?
No, it air-dries best! Baking can cause puffing or cracking.
How do I make the clay smoother?
Add a little extra oil or water while kneading.
Can I make scented clay?
Yes! Add essential oils like lavender or peppermint.
What’s the best paint for clay?
Use acrylic or tempera paint for bright colors.
Can I seal the clay?
Yes! Use clear varnish, Mod Podge, or a spray sealer.
Is this clay safe for kids?
Yes! Non-toxic and easy to clean up.
Can I reuse the clay?
Yes! Store in plastic wrap or a sealed bag.
How do I make a harder clay?
Use more salt or bake longer for a firmer texture.
Conclusion
This Homemade Modeling Clay is a fun, creative, and budget-friendly way to make sculptures, ornaments, and DIY crafts. Whether you air-dry, bake, or paint, it’s an easy, kid-friendly activity. Try it today and let your creativity shine!
PrintHomemade Modeling Clay
This Homemade Modeling Clay is soft, easy to shape, and dries hard, making it perfect for kids’ crafts, ornaments, and DIY projects! Made with simple pantry ingredients, this clay is non-toxic, air-dry, and can be colored or painted after drying.
- Prep Time: 5 minutes
- Cook Time: 5 minutes
- Total Time: 10 minutes
- Category: DIY, Crafts
- Method: Stovetop
- Cuisine: American
Ingredients
For the Basic Clay:
- 2 cups baking soda
- 1 cup cornstarch
- 1 ¼ cups water
Optional Add-Ins:
- Food coloring (for colored clay, mix into water before cooking)
- Essential oils (1-2 drops) (for scented clay like lavender or peppermint!)
- Glitter or fine sand (for a fun texture!)
Instructions
Step 1: Cook the Clay
- In a medium saucepan, whisk together baking soda and cornstarch.
- Slowly add water, stirring until smooth.
- Place saucepan over medium heat, stirring constantly.
- After 2-3 minutes, the mixture will start to thicken into a soft dough.
- Once it reaches a mashed potato-like consistency, remove from heat.
Step 2: Cool & Knead
- Transfer the warm dough to a plate or cutting board.
- Let it cool for 5-10 minutes, then knead until smooth and pliable.
Step 3: Use & Shape
- Roll out, mold, or cut into desired shapes using cookie cutters.
- If making handprints or ornaments, poke a small hole before drying.
Step 4: Dry & Harden
- Air Drying: Leave pieces on a tray for 24-48 hours, flipping halfway.
- Oven Drying: Bake at 175°F (80°C) for 1-2 hours, checking every 30 minutes.
Decorating & Storing
- Paint with acrylic or watercolor paints after drying.
- Seal with Mod Podge or clear varnish for durability.
- Store unused clay in an airtight container for up to 2 weeks.
Notes
- Want softer clay? Add 1 tbsp vegetable oil to the mix.
- Need quick drying? Place near a fan or dehumidifier.
- Gluten-Free Alternative? Use arrowroot powder instead of cornstarch.