Mini Ombre Cakes
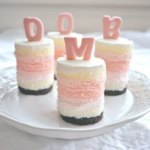
Mini Ombre Cakes are delightful individual desserts featuring layers of cake in gradually changing shades, creating a beautiful gradient effect. They’re perfect for special occasions like birthdays, weddings, or Valentine’s Day.
- Prep Time: 15 minutes
- Cook Time: 45 minutes
- Total Time: 1 hour
- Yield: Approximately 6-8 mini cakes 1x
- Category: Dessert
- Method: Baking
- Cuisine: American
Ingredients
Scale
For the Cake:
- 1 box white or vanilla cake mix (plus ingredients listed on the box: eggs, oil, water)
- Red or pink gel food coloring
For the Frosting:
- 1 cup (2 sticks) unsalted butter, softened
- 4 cups powdered sugar
- 2–4 tablespoons heavy cream or milk
- 1 teaspoon vanilla extract
- A pinch of salt
Instructions
1. Prepare the Cake Batter:
- Preheat your oven to 350°F (175°C). Grease and flour three 9-inch round cake pans, or line them with parchment paper for easier removal.
- Prepare the cake mix according to the package instructions.
- Divide the batter evenly into three separate bowls.
- Add varying amounts of red or pink gel food coloring to each bowl to create three different shades: light, medium, and dark. Mix until the colors are evenly distributed.
2. Bake the Cake Layers:
- Pour each colored batter into the prepared cake pans.
- Bake for 10-12 minutes, or until a toothpick inserted into the center comes out clean.
- Remove from the oven and let the cakes cool in the pans for a few minutes before transferring them to a wire rack to cool completely.
3. Prepare the Frosting:
- In a large mixing bowl, beat the softened butter until creamy.
- Gradually add the powdered sugar, one cup at a time, mixing well after each addition.
- Add the vanilla extract and a pinch of salt.
- Add heavy cream or milk, one tablespoon at a time, until the frosting reaches your desired consistency.
4. Assemble the Mini Cakes:
- Once the cake layers have cooled, use a 2.5-inch round cookie cutter to cut out circles from each layer. You should get about 6 circles per layer, depending on the size of your cutter.
- To assemble each mini cake, start with the darkest cake layer at the bottom. Place a small amount of frosting on top, then add the medium-colored layer, followed by more frosting, and finally the lightest layer on top. Finish with a dollop of frosting.
- Repeat this process for the remaining mini cakes.
- Optional: Decorate the tops with sprinkles, edible pearls, or chocolate decorations.
5. Serve:
- Refrigerate the mini cakes for about 30 minutes to allow the frosting to set.
- Serve and enjoy!
Notes
- Color Variations: Feel free to experiment with different colors to match your event’s theme.
- Cake Mix: Using a white or vanilla cake mix allows the added colors to appear more vibrant.
- Storage: Store any leftover mini cakes in an airtight container in the refrigerator for up to 3 days. Bring them to room temperature before serving.
Find it online: https://ukfinda.com/mini-ombre-cakes/