
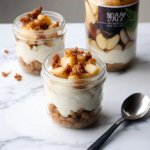
These No-Bake Apple Cheesecake Jars are a quick and delicious way to enjoy all the flavors of apple pie and creamy cheesecake in a portable, single-serving dessert. With a buttery graham cracker crust, smooth cheesecake filling, and warm cinnamon-spiced apples, these jars are perfect for fall, holidays, or anytime you want a cozy, no-bake treat!
Why You’ll Love This Recipe
- No Baking Required – Easy to make and ready in minutes.
- Perfectly Portioned – Individual servings make them great for parties or meal prep.
- Creamy & Crunchy – The rich cheesecake filling pairs perfectly with the apple topping and crust.
- Make-Ahead Friendly – Chill overnight for an even better flavor.
- Customizable – Use different toppings, crusts, or cheesecake flavors.
Ingredients
(Tip: You’ll find the full list of ingredients and measurements in the recipe card below.)
For the Crust:
- Graham cracker crumbs
- Melted butter
- Sugar
For the Cheesecake Filling:
- Cream cheese (softened)
- Powdered sugar
- Vanilla extract
- Heavy whipping cream (whipped)
For the Apple Topping:
- Apples (peeled, cored, and diced)
- Brown sugar
- Granulated sugar
- Ground cinnamon
- Nutmeg (optional)
- Lemon juice
- Butter
- Cornstarch (for thickening)
Directions

Step 1: Prepare the Crust
- In a bowl, mix graham cracker crumbs, melted butter, and sugar until combined.
- Divide the mixture evenly among small jars and press down gently to form the crust.
Step 2: Make the Cheesecake Filling
- In a large bowl, beat cream cheese, powdered sugar, and vanilla until smooth.
- In a separate bowl, whip heavy cream until stiff peaks form.
- Gently fold the whipped cream into the cream cheese mixture.
- Spoon or pipe the cheesecake filling over the crust in each jar.
Step 3: Make the Apple Topping
- In a saucepan, melt butter over medium heat. Add apples, brown sugar, granulated sugar, cinnamon, nutmeg, and lemon juice.
- Cook for 5-7 minutes until apples are soft. Stir in cornstarch to thicken the mixture.
- Let the topping cool slightly, then spoon over the cheesecake layer in each jar.
Step 4: Chill & Serve
- Cover and refrigerate for at least 2 hours before serving.
- Garnish with whipped cream or caramel drizzle if desired.
Servings and Timing
- Servings: 4-6 jars
- Prep Time: 15 minutes
- Chill Time: 2 hours
- Total Time: About 2 hours 15 minutes
Variations
- Salted Caramel Apple Cheesecake Jars – Drizzle caramel sauce over the top.
- Oreo Cheesecake Jars – Use crushed Oreos instead of graham crackers.
- Nutty Crunch – Add chopped pecans or walnuts to the crust or topping.
- Spiced Cheesecake – Mix pumpkin spice into the cheesecake filling.
- Lighter Version – Use Greek yogurt instead of heavy cream.
Storage/Reheating
- Refrigeration: Store in an airtight container for up to 4 days.
- Freezing: Freeze without the apple topping for up to 2 months. Thaw before serving.
- Make-Ahead Tip: Prepare a day ahead for the best texture and flavor.
FAQs
Can I use store-bought apple pie filling?
Yes! It’s a quick shortcut if you don’t want to make homemade topping.
Can I make this without heavy cream?
Yes! You can substitute Cool Whip or Greek yogurt for a lighter version.
How do I prevent the crust from getting soggy?
Press it down firmly and chill before adding the filling.
What’s the best apple to use?
Granny Smith, Honeycrisp, or Fuji apples hold their texture best.
Can I make these dairy-free?
Yes! Use dairy-free cream cheese and coconut whipped cream.
Do I have to chill for 2 hours?
For the best texture, yes. But if you’re short on time, 30-60 minutes will still work.
Can I serve these warm?
Yes! Warm up the apple topping separately and spoon it over before serving.
What jars should I use?
Small mason jars or dessert cups work best for easy serving.
Can I double the recipe?
Absolutely! Just adjust the ingredient amounts and use more jars.
How do I make it extra fancy?
Top with caramel sauce, whipped cream, or a sprinkle of crushed nuts.
Conclusion
These No-Bake Apple Cheesecake Jars are the perfect combination of creamy cheesecake, spiced apples, and crunchy crust—all in a convenient, single-serving jar. Whether you’re making them for a fall gathering, holiday dessert, or meal prep treat, they’re guaranteed to be a hit. Try them today and enjoy a hassle-free, delicious dessert!
PrintNo-Bake Apple Cheesecake Jars
These No-Bake Apple Cheesecake Jars are the perfect blend of creamy cheesecake, buttery graham cracker crumbs, and warm cinnamon-spiced apples. Made in individual jars, they’re great for parties, meal prep, or a cozy fall treat—no oven required!
- Prep Time: 10 minutes
- Cook Time: 15 minutes
- Total Time: 25 minutes
- Yield: 4 servings 1x
- Category: Dessert
- Method: No-Bake
- Cuisine: American
Ingredients
For the Crust:
- 1 cup graham cracker crumbs
- 2 tbsp granulated sugar
- 4 tbsp unsalted butter, melted
For the Cheesecake Filling:
- 8 oz (225g) cream cheese, softened
- 1/3 cup powdered sugar
- 1/2 tsp vanilla extract
- 1/2 cup heavy whipping cream
For the Apple Topping:
- 2 medium apples, peeled, cored, and diced (Granny Smith or Honeycrisp)
- 2 tbsp brown sugar
- 1/2 tsp cinnamon
- 1/4 tsp nutmeg
- 1 tsp lemon juice
- 1 tsp cornstarch
- 1 tbsp water
For Garnish (Optional):
- Whipped cream
- Caramel sauce
- Chopped nuts (pecans or walnuts)
Instructions
1. Make the Crust:
- In a bowl, mix graham cracker crumbs, sugar, and melted butter until combined.
- Divide evenly between 4 small jars or glasses, pressing the mixture down gently.
- Chill in the fridge while preparing the filling.
2. Prepare the Cheesecake Filling:
- In a large bowl, beat the cream cheese, powdered sugar, and vanilla extract until smooth.
- In a separate bowl, whip the heavy cream until stiff peaks form.
- Gently fold the whipped cream into the cream cheese mixture until fully combined.
- Spoon or pipe the cheesecake filling over the crust in each jar.
3. Make the Apple Topping:
- In a small saucepan over medium heat, combine diced apples, brown sugar, cinnamon, nutmeg, and lemon juice.
- Cook for 5 minutes, stirring occasionally, until apples are softened.
- In a small bowl, mix cornstarch with water, then stir into the apples to thicken the mixture.
- Remove from heat and let cool slightly.
4. Assemble & Serve:
- Spoon the cooled apple topping over the cheesecake layer in each jar.
- Top with whipped cream, caramel sauce, or chopped nuts if desired.
- Serve immediately or chill for 1-2 hours for a firmer texture.
Notes
- For a shortcut, use store-bought apple pie filling instead of making your own.
- Make it gluten-free by using gluten-free graham crackers for the crust.
- Storage: Keep in the fridge for up to 3 days (best enjoyed within 24 hours).