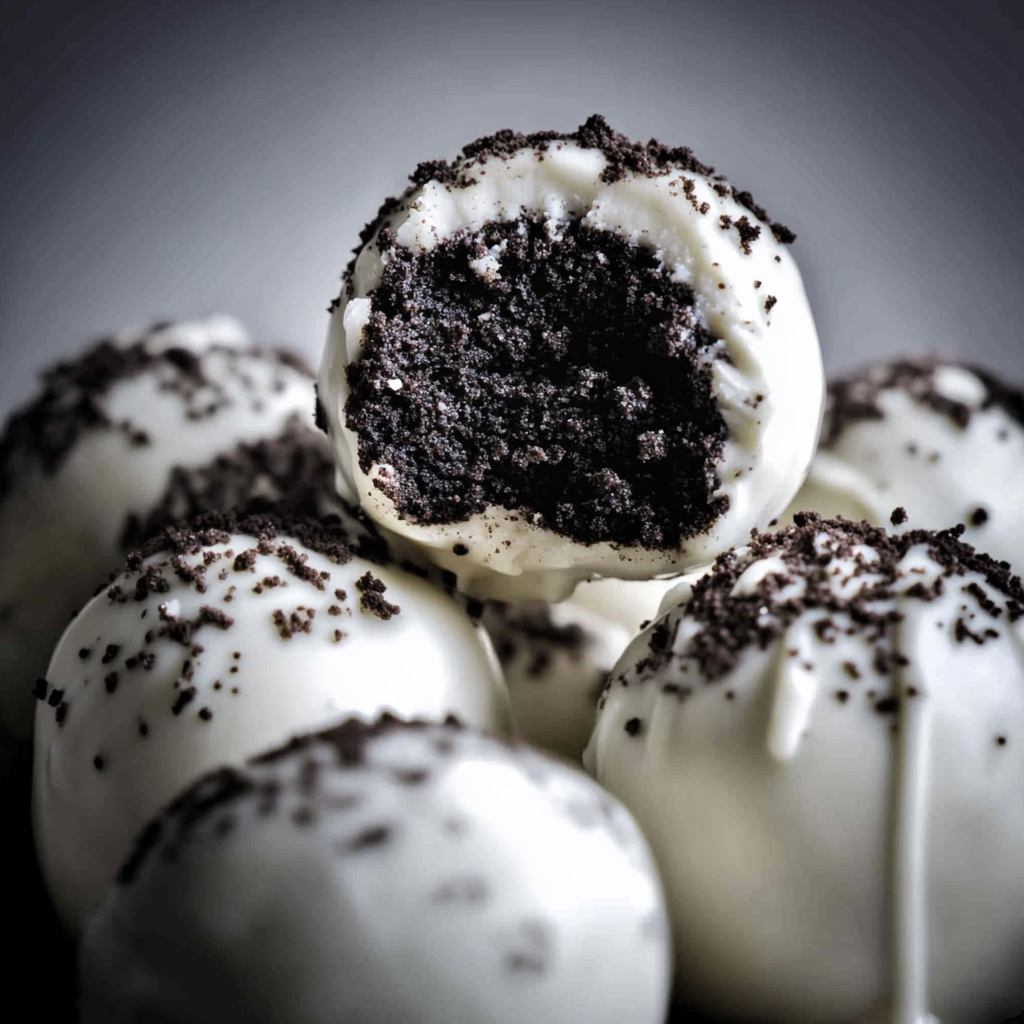
Oreo Cake Balls are a delightful no-bake dessert that combines crushed Oreos with cream cheese, all wrapped in a luscious coating of chocolate. These bite-sized treats are perfect for parties, holiday gatherings, or a quick indulgence. Easy to make and irresistibly delicious, they’re sure to be a crowd-pleaser!
Why You’ll Love This Recipe
- No-Bake Treat: No need to turn on the oven, making it perfect for any season.
- Easy to Make: Requires just a few simple ingredients and minimal effort.
- Customizable: Use different flavors of Oreos and coatings for endless variations.
- Perfect for Any Occasion: Great for parties, holidays, or gifting.
Ingredients
(Tip: You’ll find the full list of ingredients and measurements in the recipe card below.)
- Oreo cookies
- Cream cheese
- Chocolate for coating (milk, dark, or white)
- Optional toppings: sprinkles, crushed Oreos, or drizzle
Directions

- Crush the Oreos: Place Oreo cookies in a food processor and blend until fine crumbs form.
- Mix with Cream Cheese: In a large bowl, combine the crushed Oreos with softened cream cheese until a smooth dough forms.
- Shape into Balls: Roll the mixture into small balls and place them on a baking sheet lined with parchment paper.
- Chill: Refrigerate the balls for 20-30 minutes to firm up.
- Melt the Chocolate: While the balls are chilling, melt your choice of chocolate in the microwave or over a double boiler.
- Coat the Balls: Dip each chilled ball into the melted chocolate, ensuring it is fully coated. Use a fork to lift and place back on the parchment paper.
- Decorate: Add sprinkles, crushed Oreos, or drizzle with contrasting chocolate while the coating is still wet.
- Set: Allow the chocolate to harden at room temperature or in the fridge.
- Serve and Enjoy: Once set, your Oreo Cake Balls are ready to be enjoyed!
Servings and Timing
- Servings: Approximately 24 cake balls (depending on size)
- Prep Time: 20 minutes
- Chill Time: 30 minutes
- Total Time: 50 minutes
Variations
- Flavored Oreos: Try using mint, golden, or peanut butter Oreos for a twist.
- Different Coatings: Experiment with white chocolate, dark chocolate, or even candy melts.
- Toppings: Decorate with crushed nuts, coconut flakes, or edible glitter.
- Themed Colors: Use colored chocolate or sprinkles to match holiday or party themes.
Storage/Reheating
- Storage: Store Oreo Cake Balls in an airtight container in the refrigerator for up to one week.
- Freezing: Freeze them in a sealed container for up to three months. Thaw in the refrigerator before serving.
- Reheating: These treats are best served cold or at room temperature and do not require reheating.
FAQs
1. Can I make Oreo Cake Balls ahead of time?
Yes, they can be made up to a week in advance and stored in the refrigerator.
2. Can I use reduced-fat cream cheese?
Yes, reduced-fat cream cheese works, but the texture may be slightly different.
3. Can I skip the chocolate coating?
While the coating enhances the flavor, you can skip it and serve the balls plain or dusted with cocoa powder.
4. Can I use a hand mixer instead of a food processor?
Yes, you can crush the Oreos in a ziplock bag and mix the ingredients with a hand mixer.
5. What’s the best chocolate for coating?
High-quality melting chocolate or candy melts work best for a smooth finish.
6. Can I add flavoring to the mixture?
Yes, you can add a splash of vanilla extract or a few drops of mint extract for additional flavor.
7. How can I make these gluten-free?
Use gluten-free Oreo cookies or a similar substitute.
8. Can I use vegan cream cheese?
Yes, vegan cream cheese works as a substitute for a dairy-free version.
9. Why are my balls falling apart?
Ensure the mixture is well-combined and chilled before shaping to prevent crumbling.
10. Can I double the recipe?
Absolutely! Simply double the ingredients to make a larger batch.
Conclusion
Oreo Cake Balls are a simple yet indulgent treat that will satisfy any sweet tooth. With their creamy interior, chocolatey coating, and endless customization options, they’re perfect for every occasion. Whip up a batch today and enjoy the delightful fusion of Oreos and chocolate!
PrintOreo Cake Balls
These Oreo Cake Balls are a simple, no-bake treat made with crushed Oreos and cream cheese, then dipped in melted chocolate. They’re perfect for parties, gifts, or anytime you crave a bite-sized dessert!
- Prep Time: 30 minutes
- Cook Time: 30 minutes
- Total Time: 1 hour
- Yield: 20–24 cake balls 1x
- Category: Dessert, Snack
- Method: No-Bake
- Cuisine: American
Ingredients
- 1 package (36 cookies, about 300 g) Oreo cookies
- 8 oz (225 g) cream cheese, softened
- 200 g (7 oz) white or semi-sweet chocolate, melted
- Sprinkles, crushed Oreos, or cocoa powder for decoration (optional)
Instructions
- Crush the Oreos:
- Place the Oreo cookies in a food processor and pulse until they are fine crumbs. Alternatively, place the cookies in a zip-top bag and crush them with a rolling pin.
- Combine with Cream Cheese:
- In a large bowl, mix the crushed Oreos with the softened cream cheese until fully combined and smooth. The mixture should be moist and easy to shape.
- Shape the Balls:
- Roll the mixture into 1-inch balls and place them on a baking sheet lined with parchment paper. Refrigerate or freeze the balls for 20-30 minutes, or until firm.
- Dip in Chocolate:
- Melt the white or semi-sweet chocolate in a microwave-safe bowl, heating in 30-second increments and stirring until smooth.
- Using a fork or skewer, dip each chilled ball into the melted chocolate, letting the excess drip off. Place the dipped balls back on the parchment paper.
- Decorate:
- Before the chocolate sets, garnish with sprinkles, crushed Oreos, or a drizzle of additional melted chocolate.
- Chill and Serve:
- Refrigerate the cake balls for at least 30 minutes to allow the chocolate to harden. Serve chilled or at room temperature.
Notes
- For variety, try using flavored Oreos like mint, peanut butter, or golden Oreos.
- Store in an airtight container in the refrigerator for up to 1 week or freeze for up to 2 months.
- Add a splash of vanilla or almond extract to the Oreo mixture for an extra layer of flavor.


