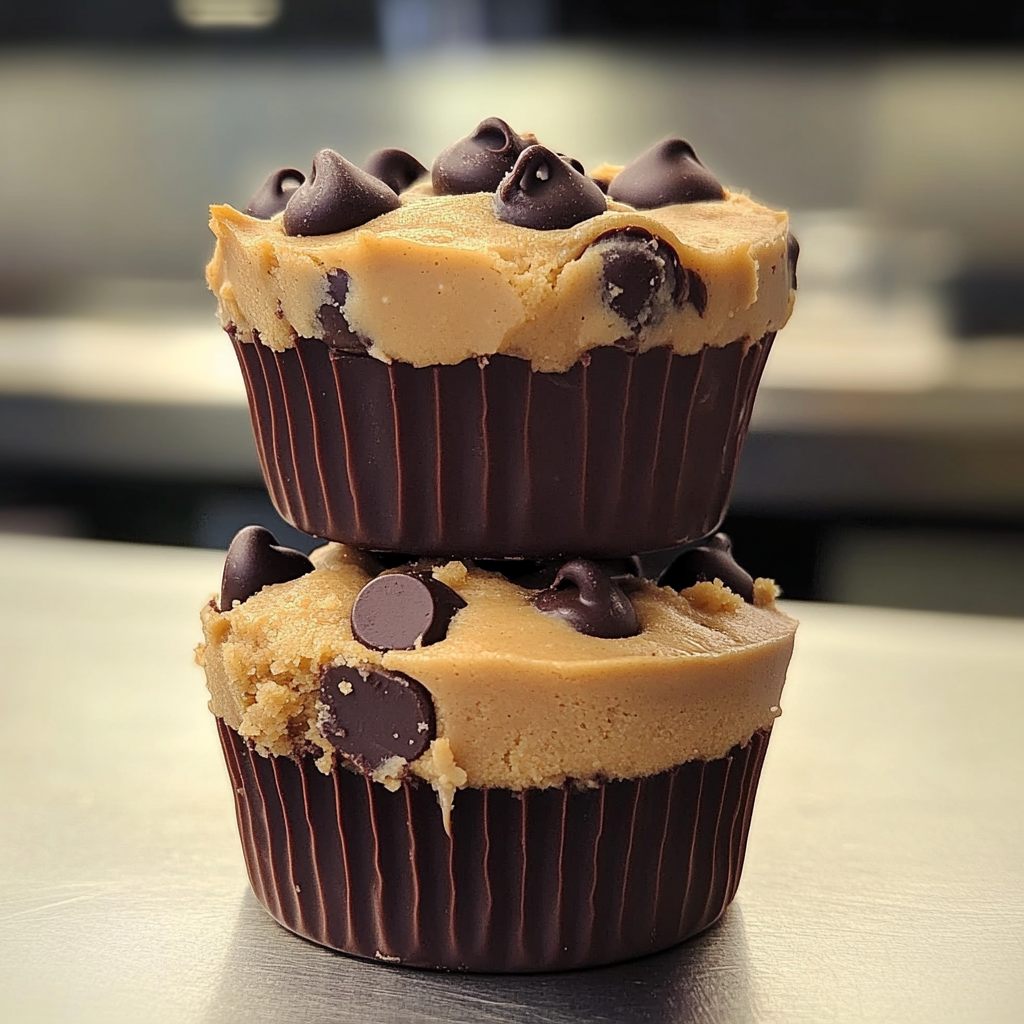
Peanut Butter Chocolate Chip Cookie Cups are a decadent dessert that combines two beloved flavors—peanut butter and chocolate—in a fun, bite-sized format. These treats feature soft and chewy peanut butter cookie dough baked into cup shapes, filled with rich chocolate, making them perfect for parties, holidays, or as a sweet indulgence anytime.
Why You’ll Love This Recipe
- A fun and unique twist on classic cookies.
- Combines the irresistible flavors of peanut butter and chocolate.
- Easy to make with simple ingredients.
- Perfect for portion-controlled desserts.
- Versatile—customize the fillings to suit your taste.
Ingredients
(Tip: You’ll find the full list of ingredients and measurements in the recipe card below.)
- All-purpose flour
- Baking soda
- Salt
- Unsalted butter, softened
- Granulated sugar
- Brown sugar
- Creamy peanut butter
- Egg
- Vanilla extract
- Semi-sweet chocolate chips (or milk chocolate, if preferred)
Optional Fillings
- Mini Reese’s cups
- Nutella
- Marshmallow fluff
Directions

Prepare the Dough
- Preheat the Oven: Preheat your oven to 350°F (175°C) and lightly grease a mini muffin tin.
- Mix Dry Ingredients: In a medium bowl, whisk together the flour, baking soda, and salt.
- Cream Wet Ingredients: In a large mixing bowl, cream the softened butter, granulated sugar, and brown sugar until light and fluffy. Add the peanut butter, egg, and vanilla extract, mixing until well combined.
- Combine: Gradually add the dry ingredients to the wet ingredients, mixing until a soft dough forms.
Assemble the Cookie Cups
- Shape the Dough: Roll the dough into 1-inch balls and place each ball into a cavity of the mini muffin tin.
- Bake: Bake for 10–12 minutes, or until the edges are set and lightly golden.
- Create the Cups: While the cookies are still warm, use the back of a spoon or a small cookie scoop to press down the center of each cookie, forming a cup shape.
Add the Filling
- Melt the Chocolate: Melt the chocolate chips in the microwave in 20-second increments, stirring after each, until smooth.
- Fill the Cups: Spoon or pipe the melted chocolate into the center of each cookie cup. Alternatively, place a mini Reese’s cup, Nutella, or your favorite filling directly into the warm cookie cups.
- Cool: Let the cookie cups cool in the tin for 10 minutes before transferring them to a wire rack to cool completely.
Servings and Timing
- Servings: Makes 24 cookie cups
- Prep Time: 15 minutes
- Cook Time: 10–12 minutes
- Total Time: 30 minutes
Variations
- Double Chocolate: Add cocoa powder to the dough for extra chocolatey flavor.
- Nut-Free: Substitute sunflower seed butter for a nut-free version.
- Caramel Surprise: Fill with melted caramel or caramel candies for a gooey center.
- S’mores Twist: Add a dollop of marshmallow fluff and a piece of graham cracker on top.
- Minty Fresh: Use Andes mints or mint chocolate chips as the filling.
Storage/Reheating
- Storage: Store in an airtight container at room temperature for up to 5 days or in the refrigerator for up to a week.
- Freezing: Freeze unfilled cookie cups in a single layer on a baking sheet, then transfer to a freezer-safe bag for up to 2 months. Thaw and fill when ready to serve.
- Reheating: Warm in the microwave for 10–15 seconds for a freshly baked feel.
FAQs
1. Can I use chunky peanut butter?
Yes, but the texture will be slightly different, and the cups may be less smooth.
2. What if I don’t have a mini muffin tin?
You can use a regular muffin tin for larger cookie cups but increase the bake time by 2–3 minutes.
3. Can I make these gluten-free?
Yes, substitute the all-purpose flour with a gluten-free flour blend.
4. Can I use pre-made cookie dough?
Yes, store-bought peanut butter cookie dough works as a convenient alternative.
5. How do I keep the cookie cups from sticking?
Ensure the muffin tin is well-greased, or use silicone muffin liners for easy removal.
6. Can I add mix-ins to the dough?
Yes, mini chocolate chips or chopped peanuts make great additions.
7. What’s the best way to press the centers?
A small spoon, the handle of a wooden spoon, or a measuring spoon works well.
8. Can I use white chocolate?
Absolutely! White chocolate makes a delicious alternative filling.
9. How do I prevent the cups from collapsing?
Press gently when forming the cups and avoid overbaking the cookie dough.
10. Can I make these ahead of time?
Yes, the cookie cups can be made a day ahead and filled just before serving.
Conclusion
Peanut Butter Chocolate Chip Cookie Cups are a delightful and versatile dessert that’s sure to impress. With their rich peanut butter cookie base and customizable fillings, they’re a treat everyone will love. Whether for a party, holiday, or just because, these cookie cups are a must-try!
PrintPeanut Butter Chocolate Chip Cookie Cups
These Peanut Butter Chocolate Chip Cookie Cups are soft, chewy, and filled with rich, creamy peanut butter. A delightful combination of flavors and textures, these treats are perfect for peanut butter and chocolate lovers alike!
- Prep Time: 15 minutes
- Cook Time: 15 minutes
- Total Time: 30 minutes
- Yield: 24 cookie cups 1x
- Category: Dessert, Snack
- Method: Baking
- Cuisine: American
Ingredients
For the Cookie Cups:
- 1/2 cup (115 g) unsalted butter, softened
- 1/2 cup (100 g) granulated sugar
- 1/2 cup (100 g) packed brown sugar
- 1 large egg
- 1 tsp vanilla extract
- 1 1/2 cups (190 g) all-purpose flour
- 1/2 tsp baking soda
- 1/4 tsp salt
- 1 cup (175 g) semi-sweet chocolate chips
For the Peanut Butter Filling:
- 3/4 cup (180 g) creamy peanut butter
- 1/4 cup (50 g) powdered sugar
- 2 tbsp unsalted butter, softened
Instructions
1. Preheat the Oven:
- Preheat your oven to 350°F (175°C). Grease a mini muffin tin or line it with paper liners.
2. Make the Cookie Dough:
- In a large bowl, beat the butter, granulated sugar, and brown sugar until creamy.
- Add the egg and vanilla extract and mix until smooth.
- In a separate bowl, whisk together the flour, baking soda, and salt. Gradually add the dry ingredients to the wet ingredients, mixing until just combined.
- Fold in the chocolate chips.
3. Form the Cookie Cups:
- Scoop about 1 tablespoon of cookie dough into each cavity of the mini muffin tin. Use your fingers or the back of a spoon to press the dough down and create a shallow well in the center.
4. Bake:
- Bake for 10-12 minutes, or until the edges are lightly golden. The centers will still look soft. Remove from the oven and use a small spoon or the end of a wooden spoon to press the centers down again, forming a cup shape. Let the cookie cups cool in the tin for 10 minutes before transferring to a wire rack.
5. Make the Peanut Butter Filling:
- In a small bowl, mix the peanut butter, powdered sugar, and softened butter until smooth and creamy.
6. Fill the Cookie Cups:
- Spoon or pipe the peanut butter filling into the cooled cookie cups.
7. Serve and Enjoy:
- Serve at room temperature or chilled. Store any leftovers in an airtight container at room temperature or in the fridge for up to 5 days.
Notes
- For extra indulgence, top the filling with a drizzle of melted chocolate or sprinkle with mini chocolate chips.
- Use crunchy peanut butter for added texture if desired.
- These can also be frozen for up to 2 months; thaw in the fridge before serving.

