
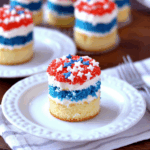
Celebrate Independence Day with these delightful Red, White, and Blue Mini Cakes. These individual treats feature vibrant layers of red and blue cake, separated by creamy white frosting, and topped with festive sprinkles. Perfect for Fourth of July gatherings, they offer a fun and patriotic dessert option that’s sure to impress your guests.
Why You’ll Love This Recipe
- Festive Appearance: The bold red, white, and blue layers make these mini cakes a standout at any patriotic celebration.
- Individual Servings: Perfectly portioned for guests, eliminating the need for slicing and serving.
- Customizable: Easily adapt the colors and decorations to suit other holidays or themes.
- Make-Ahead Friendly: Prepare in advance and assemble before serving for convenience.
Ingredients
(Tip: You’ll find the full list of ingredients and measurements in the recipe card below.)
- 2 boxes white cake mix
- Red food coloring
- Blue food coloring
- White frosting (store-bought or homemade)
- Red, white, and blue sprinkles
- Non-stick cooking spray
Directions

- Prepare the Cake Batter:
- Preheat your oven according to the cake mix instructions.
- Prepare one box of cake mix as directed. Add red food coloring to achieve the desired shade.
- Prepare the second box of cake mix as directed. Add blue food coloring to achieve the desired shade.
- Bake the Cakes:
- Spray two 12×16-inch rimmed baking sheets with non-stick cooking spray.
- Pour the red batter into one sheet and the blue batter into the other, spreading evenly.
- Bake according to the cake mix instructions, typically 20–30 minutes, or until a toothpick inserted into the center comes out clean.
- Allow the cakes to cool completely.
- Assemble the Mini Cakes:
- Using a 2-inch round cookie cutter, cut out circles from both the red and blue cakes.
- Place a blue cake circle on a serving plate. Spread a layer of white frosting on top.
- Place a red cake circle on top of the frosting. Spread another layer of white frosting on top.
- Repeat with remaining cake circles.
- Decorate:
- Sprinkle the tops of the mini cakes with red, white, and blue sprinkles.
- Refrigerate until ready to serve.
Servings and Timing
- Servings: Approximately 24 mini cakes
- Preparation Time: 30 minutes
- Baking Time: 30 minutes
- Cooling Time: 30 minutes
- Total Time: 1 hour 30 minutes
Variations
- Flavor Variations: Use different cake flavors like vanilla, lemon, or almond for a unique twist.
- Frosting Options: Substitute white frosting with cream cheese frosting or whipped cream for a different taste.
- Decorations: Top with fresh berries, edible glitter, or themed toppers to match various occasions.
Storage/Reheating
- Storage: Store assembled mini cakes in an airtight container in the refrigerator for up to 3 days.
- Freezing: Freeze unassembled cake circles for up to 1 month. Thaw and assemble with fresh frosting before serving.
- Reheating: Not recommended, as these cakes are best served chilled or at room temperature.
FAQs
Can I use homemade cake batter instead of boxed mix?
Yes, you can use your favorite homemade white cake recipe. Ensure the batter is suitable for coloring and yields a light, fluffy texture.
What type of food coloring is best?
Gel food coloring is recommended for vibrant colors without altering the batter’s consistency.
Can I make these mini cakes in advance?
Absolutely. You can bake the cake layers and cut out the circles a day ahead. Assemble and decorate the mini cakes on the day of serving.
How do I prevent the cake from sticking to the cutter?
Dip the cookie cutter in flour or powdered sugar between cuts to prevent sticking.
Can I make different shapes instead of circles?
Yes, use cookie cutters in various shapes like stars or hearts to match different themes or occasions.
Is it possible to make a gluten-free version?
Yes, use a gluten-free white cake mix and ensure all other ingredients are gluten-free.
Can I use natural food coloring?
Natural food colorings can be used, but the colors may be less vibrant. Beet juice for red and blueberry juice for blue are common alternatives.
How do I store leftovers?
Place leftover mini cakes in an airtight container and refrigerate for up to 3 days.
Can I add fillings between the layers?
Certainly. Add a layer of jam, fruit preserves, or flavored cream between the cake layers for added flavor.
Are these suitable for outdoor events?
Yes, but keep them in a cool place to prevent the frosting from melting, especially in warm weather.
Conclusion
Red, White, and Blue Mini Cakes are a delightful and festive addition to your Independence Day celebrations. Their vibrant colors, individual servings, and customizable options make them a crowd-pleaser for guests of all ages. Easy to prepare and assemble, these mini cakes are sure to become a holiday favorite. Enjoy crafting and sharing these patriotic treats with your loved ones!
PrintRed, White, and Blue Mini Cakes
Red, White, and Blue Mini Cakes are adorable, layered desserts made with vibrant colored cake layers and creamy frosting, perfect for patriotic celebrations like the 4th of July and Memorial Day.
- Prep Time: 30 minutes
- Cook Time: 20 minutes
- Total Time: 1 hour 30 minutes
- Yield: 10 mini cakes 1x
- Category: Dessert
- Method: Baked
- Cuisine: American
- Diet: Vegetarian
Ingredients
- 1 box white cake mix, plus ingredients listed on box
- Red and blue food coloring
- 1 cup butter, softened
- 3–4 cups powdered sugar
- 2–3 tablespoons heavy cream or milk
- 1 teaspoon vanilla extract
- Pinch of salt
- Optional: patriotic sprinkles for garnish
Instructions
- Preheat oven to 350°F (175°C). Prepare the white cake mix according to package instructions.
- Divide the batter evenly into three bowls. Tint one bowl red, one blue, and leave one white.
- Pour each batter into a separate greased and floured 8-inch round cake pan (or bake in batches if needed).
- Bake for 15–18 minutes or until a toothpick inserted in the center comes out clean. Let cool completely.
- Using a round cookie cutter or biscuit cutter, cut out small cake rounds from each color layer.
- Make the frosting by beating softened butter until creamy. Add powdered sugar gradually, then vanilla, salt, and cream until smooth and fluffy.
- To assemble, layer one red, one white, and one blue cake circle with frosting between each layer.
- Frost the tops and sides if desired, or leave sides exposed for a “naked cake” look. Garnish with sprinkles.
- Refrigerate for at least 30 minutes before serving to help set the frosting.
Notes
- Use gel food coloring for more vibrant red and blue layers.
- Store mini cakes in the fridge and bring to room temperature before serving.
- You can bake the cakes in a sheet pan for easier cutting and layering.
Nutrition
- Serving Size: 1 mini cake
- Calories: 280
- Sugar: 28g
- Sodium: 210mg
- Fat: 12g
- Saturated Fat: 7g
- Unsaturated Fat: 5g
- Trans Fat: 0g
- Carbohydrates: 40g
- Fiber: 0g
- Protein: 2g
- Cholesterol: 35mg