
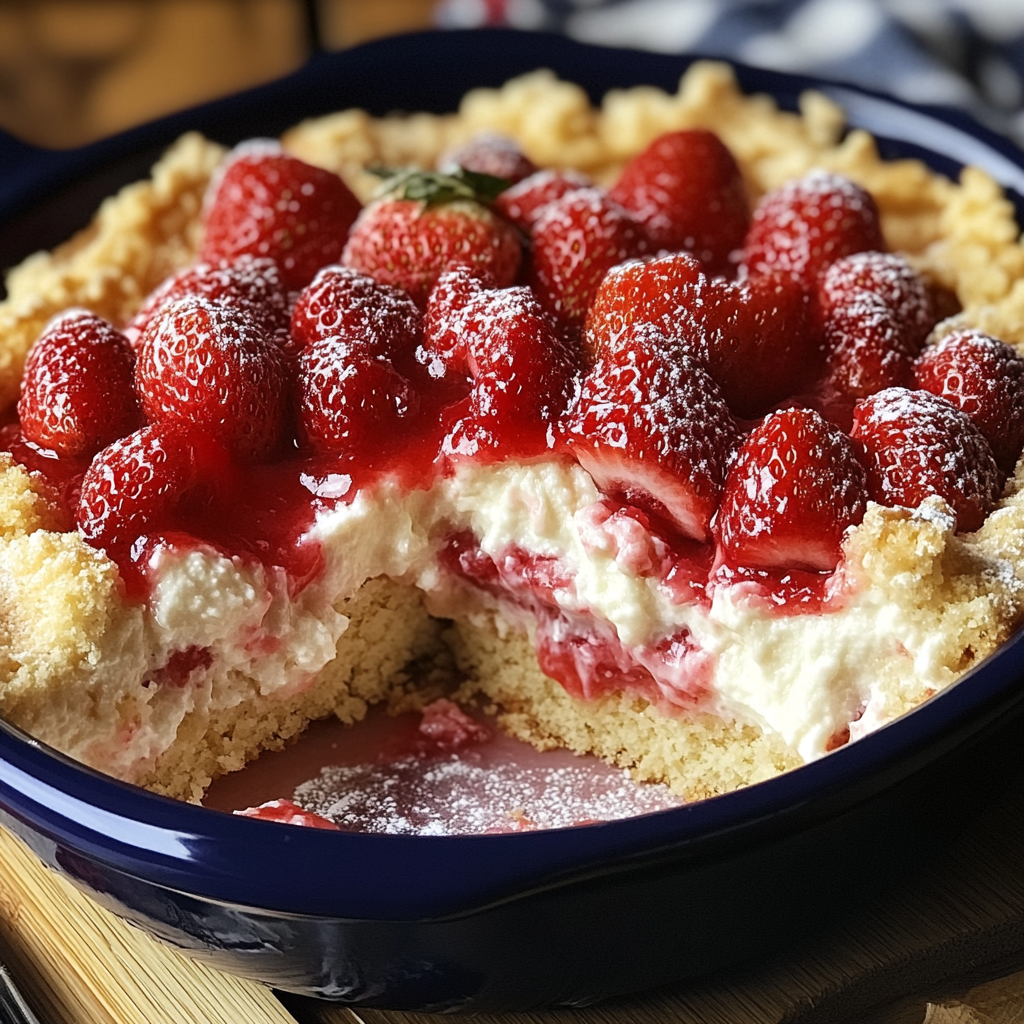
If you’re looking for a quick and mouthwatering dessert that’s perfect for any occasion, look no further than this Strawberry Cheesecake Dump Cake. Combining the sweet and tangy flavors of strawberries with the creamy richness of cheesecake and the comfort of a classic dump cake, this recipe is bound to become a favorite in your dessert repertoire.
What is a Dump Cake?
A dump cake is an incredibly easy-to-make dessert where ingredients are simply “dumped” into a baking dish and baked until golden and bubbly. Unlike traditional cakes that require mixing or layering, dump cakes offer convenience without compromising on flavor. The result? A sweet, gooey dessert that’s nearly impossible to resist!
Why You’ll Love This Strawberry Cheesecake Dump Cake
- Effortless Preparation: No need for complicated steps or fancy equipment—this dump cake comes together in just a few minutes.
- Deliciously Creamy: The combination of strawberry filling and cheesecake flavors creates a rich, creamy texture that will melt in your mouth.
- Perfect for Any Occasion: Whether it’s a family dinner, a BBQ, or a holiday celebration, this dessert will be a hit with guests of all ages.
- Customizable: You can easily swap in your favorite fruit or add some toppings like whipped cream, chocolate drizzle, or fresh berries to make it even more indulgent.
Ingredients for Strawberry Cheesecake Dump Cake
- 1 box of yellow cake mix (or white cake mix for a lighter flavor)
- 1 can (21 oz) strawberry pie filling
- 1 package (8 oz) cream cheese (softened)
- ½ cup (1 stick) butter (melted)
- ½ cup granulated sugar
- 1 teaspoon vanilla extract
- ½ cup sour cream (optional, for added creaminess)
Step-by-Step Instructions
- Preheat Your Oven: Preheat your oven to 350°F (175°C) and prepare a 9×13-inch baking dish by greasing it lightly or using non-stick spray.
- Layer the Strawberry Filling: Spread the strawberry pie filling evenly on the bottom of the prepared baking dish.
- Prepare the Cheesecake Layer: In a medium bowl, combine the softened cream cheese, sugar, vanilla extract, and sour cream (if using). Mix well until smooth and creamy. Spoon the cream cheese mixture over the strawberry filling in the baking dish. Use a spatula to spread it evenly across the strawberries.
- Add the Cake Mix: Evenly sprinkle the dry cake mix over the top of the cheesecake layer. Don’t stir or mix—just let it sit on top.
- Top with Butter: Drizzle the melted butter evenly over the cake mix. The butter will melt into the cake mix as it bakes, creating a delicious, crisp top.
- Bake to Perfection: Bake the cake for 40-45 minutes or until the top is golden brown and bubbly. The cheesecake layer will set, and the cake mix will create a wonderful crust.
- Cool and Serve: Let the cake cool for about 10 minutes before serving. This dessert is best enjoyed warm, with a dollop of whipped cream or a scoop of vanilla ice cream on top.
Tips for the Perfect Strawberry Cheesecake Dump Cake
- Use Fresh Strawberries: If you’re in the mood for a fresh twist, you can substitute the strawberry pie filling with fresh strawberries mixed with a bit of sugar to create your own fruit filling.
- Add a Crunchy Topping: For a little extra texture, sprinkle some chopped nuts like almonds, pecans, or walnuts on top before baking.
- Mix Up the Cake Mix Flavor: While this recipe calls for yellow cake mix, you can experiment with other cake flavors like white or even strawberry cake mix for an extra burst of flavor.
Variations to Try
- Peach Cheesecake Dump Cake: Swap the strawberries for peach pie filling for a completely different yet equally delicious dessert.
- Blueberry Cheesecake Dump Cake: Try blueberries instead of strawberries for a tart and sweet combination.
- Chocolate Cheesecake Dump Cake: For chocolate lovers, substitute the yellow cake mix for a chocolate cake mix and drizzle chocolate syrup on top for an indulgent treat.
Why Make This Strawberry Cheesecake Dump Cake?
Not only is this strawberry cheesecake dump cake easy to make, but it’s also a crowd-pleaser. It takes just a few simple ingredients to create a showstopping dessert that will satisfy any sweet tooth. The balance of sweet strawberries, creamy cheesecake, and buttery cake makes this the ultimate comfort food for any season.
Whether you’re a beginner in the kitchen or an experienced baker, this dessert will impress everyone at the table. With minimal effort and maximum flavor, it’s the ideal recipe for busy weeknights or special events.
Final Thoughts
This Strawberry Cheesecake Dump Cake is the perfect way to enjoy the classic flavors of cheesecake and strawberries without all the effort. With its simple preparation and delicious results, it’s a dessert that everyone will love and you’ll want to make time and time again. Happy baking!
Serving and Storage Tips for Strawberry Cheesecake Dump Cake
Serving Tips:
- Serve Warm: Strawberry Cheesecake Dump Cake is best enjoyed warm, straight from the oven or after letting it cool for about 10 minutes. The creamy cheesecake layer and gooey strawberry filling are more delightful when served at a cozy temperature.
- Toppings: Enhance the flavor with a dollop of whipped cream, a scoop of vanilla ice cream, or a drizzle of chocolate syrup. Fresh strawberries or a handful of chopped nuts (like almonds or pecans) can add an extra layer of texture and flavor.
- Individual Portions: For a fun presentation, scoop the cake into individual servings and top each one with a sprinkle of powdered sugar, a fresh mint leaf, or a few extra strawberries for garnish.
- Pair with Beverages: Serve alongside a warm beverage like coffee or tea for a perfect dessert pairing, or opt for a refreshing drink like lemonade or sparkling water to balance the richness of the cake.
Storage Tips:
- Cool Completely Before Storing: Allow the cake to cool completely at room temperature before storing to prevent condensation, which can make the cake soggy.
- Refrigeration: Store any leftovers in an airtight container in the refrigerator for up to 3-4 days. The cheesecake layer may become firmer once chilled, but the cake will still be delicious.
- Freezing: If you want to keep this dessert longer, you can freeze it. Once it’s fully cooled, cover it tightly with plastic wrap and foil. It can be stored in the freezer for up to 2-3 months. To serve, let it thaw in the refrigerator overnight, then warm it up in the oven at 350°F (175°C) for about 15-20 minutes for that fresh-baked taste.
- Reheating: To reheat individual servings, microwave on a low setting for about 30-45 seconds, or warm in the oven for 10 minutes to restore the soft, gooey texture.
Tip for Best Texture: If reheating from the refrigerator or freezer, be sure to check the cake occasionally to ensure the top doesn’t dry out. You can cover it loosely with foil to keep it moist during reheating.
By following these serving and storage tips, you’ll ensure that your Strawberry Cheesecake Dump Cake stays fresh, flavorful, and ready to delight every time you dig in!
- Can I use fresh strawberries instead of pie filling? Yes, you can use fresh strawberries! Simply chop them up and mix with a little sugar to help create a sweet, juicy filling. If you prefer a thicker filling, you can add a bit of cornstarch to the strawberries before layering them in the baking dish.
- Can I make Strawberry Cheesecake Dump Cake ahead of time? Yes, you can prepare this cake ahead of time. You can assemble it and store it in the refrigerator (before baking) for up to 24 hours. When ready to bake, simply pop it in the oven, following the baking instructions. Alternatively, you can bake it and store it in the refrigerator, reheating it when you’re ready to serve.
- Can I use a different flavor of cake mix? Absolutely! While this recipe calls for yellow cake mix, you can experiment with different flavors like white, strawberry, or even chocolate cake mix. Each variation will give the dessert a unique twist while keeping the delicious cheesecake and fruit combination intact.
- Can I freeze Strawberry Cheesecake Dump Cake? Yes, this dessert freezes well! After baking, let it cool completely and then wrap it tightly in plastic wrap and foil before freezing. It can be stored in the freezer for up to 2-3 months. To reheat, thaw in the refrigerator overnight and warm in the oven at 350°F (175°C) for 15-20 minutes for the best texture.
Strawberry Cheesecake Dump Cake
This Strawberry Cheesecake Dump Cake is a delightful and easy-to-make dessert that combines the sweet flavors of strawberry pie filling with a creamy cheesecake layer, all topped with a buttery cake mix crust. It’s perfect for any occasion and requires minimal preparation.
- Prep Time: 10 minutes
- Cook Time: 45 minutes
- Total Time: 55 minutes
- Yield: 12 servings 1x
- Category: Dessert
- Method: Baking
- Cuisine: American
Ingredients
2 cans (21 ounces each) strawberry pie filling
1 package (8 ounces) cream cheese, softened
½ cup granulated sugar
1 teaspoon vanilla extract
1 box (15.25 ounces) yellow cake mix
1 cup (2 sticks) unsalted butter, melted
Instructions
Preheat Oven:
Preheat your oven to 350°F (175°C).
Grease a 9×13-inch baking dish with non-stick cooking spray.
Layer Strawberry Filling:
Spread the strawberry pie filling evenly over the bottom of the prepared baking dish.
Prepare Cheesecake Mixture:
In a medium bowl, beat the softened cream cheese until smooth.
Add the granulated sugar and vanilla extract; continue to beat until well combined and creamy.
Add Cheesecake Layer:
Drop spoonfuls of the cream cheese mixture over the strawberry pie filling.
Gently spread to create an even layer.
Add Cake Mix:
Sprinkle the dry yellow cake mix evenly over the cream cheese layer, covering it completely.
Add Butter:
Pour the melted butter evenly over the top of the cake mix.
Ensure all areas are covered; this will create a golden, crispy topping.
Bake:
Bake in the preheated oven for 45-50 minutes, or until the top is golden brown and the filling is bubbly.
Cool and Serve:
Allow the cake to cool for about 15 minutes before serving.
Serve warm, optionally topped with whipped cream or vanilla ice cream.
Notes
For added texture, consider sprinkling chopped nuts, such as pecans or almonds, over the cake mix before baking.
This dessert can be stored in the refrigerator for up to 3 days. Reheat individual servings in the microwave if desired.