
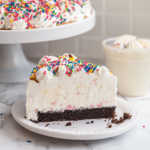
This Copycat Dairy Queen Ice Cream Cake is a homemade version of the beloved frozen dessert that features layers of creamy vanilla and chocolate ice cream, a rich fudge center, and crunchy chocolate cookie crumbles. Finished with a light and fluffy whipped topping, this easy-to-make treat is perfect for birthdays, celebrations, or just when you’re craving that classic DQ flavor from the comfort of home!
Why You’ll Love This Recipe
- Just like the real thing – Creamy, crunchy, and fudgy layers that taste just like the original.
- Customizable – Use your favorite ice cream flavors or add extra toppings.
- Perfect for celebrations – A show-stopping dessert for birthdays, holidays, or special events.
- Make-ahead dessert – Freezes well and can be prepared in advance.
- No baking required – Easy to assemble and chill—no oven needed!
Ingredients
(Tip: You’ll find the full list of ingredients and measurements in the recipe card below.)
For the cake layers:
- 1.5 quarts chocolate ice cream (softened)
- 1.5 quarts vanilla ice cream (softened)
For the fudge and crunch layer:
- 1 cup hot fudge sauce (store-bought or homemade)
- 1 cup crushed chocolate sandwich cookies (like Oreos)
- 2 tablespoons butter (melted)
For the whipped topping:
- 2 cups heavy whipping cream
- ¼ cup powdered sugar
- 1 teaspoon vanilla extract
Optional toppings:
- Chocolate shavings
- Sprinkles
- Extra cookie crumbles
- Maraschino cherries
Directions

1. Prepare the pan:
- Line a 9-inch springform pan with plastic wrap or parchment paper, allowing extra to hang over the sides for easy removal.
2. Make the cookie crunch layer:
- Mix crushed cookies with melted butter until fully coated.
- Spread evenly on a parchment-lined baking sheet and freeze for 10 minutes to set.
3. Add the first ice cream layer:
- Spread softened chocolate ice cream evenly over the bottom of the pan.
- Place the pan in the freezer for 30 minutes to firm up.
4. Add the fudge and cookie crunch layer:
- Spread an even layer of hot fudge sauce over the chocolate ice cream.
- Sprinkle the frozen cookie crumbles evenly over the fudge layer.
- Freeze for another 30 minutes.
5. Add the second ice cream layer:
- Spread softened vanilla ice cream over the fudge and cookie layer.
- Smooth the top and freeze for at least 2 hours or overnight for best results.
6. Make the whipped topping:
- In a large mixing bowl, whip the heavy cream, powdered sugar, and vanilla extract until stiff peaks form.
7. Decorate the cake:
- Remove the cake from the springform pan and peel away the plastic wrap.
- Frost the sides and top of the cake with the whipped cream mixture.
- Add decorative swirls, sprinkles, chocolate shavings, or cherries as desired.
8. Freeze and serve:
- Freeze for an additional 1–2 hours before slicing.
- Let the cake sit at room temperature for 10–15 minutes before cutting for easier slicing.
Servings and Timing
- Servings: 12 slices
- Prep Time: 30 minutes
- Freezing Time: 4–6 hours (or overnight)
- Total Time: 5–7 hours
Variations
- Mint Chocolate Ice Cream Cake: Swap the vanilla ice cream for mint chocolate chip and use mint Oreos for the crunch layer.
- Peanut Butter Fudge Cake: Add a layer of peanut butter sauce between the ice cream layers.
- Strawberry Ice Cream Cake: Use strawberry ice cream instead of chocolate for a fruity twist.
- Caramel Swirl Cake: Replace hot fudge sauce with caramel sauce for a buttery, sweet flavor.
- Vegan Version: Use dairy-free ice cream, coconut whipped cream, and vegan chocolate cookies.
Storage/Reheating
- Storage: Store the cake tightly wrapped in plastic wrap or in an airtight container in the freezer for up to 2 weeks.
- Freezing: Always keep frozen until ready to serve.
- Reheating: Let the cake sit at room temperature for 10–15 minutes to soften before slicing.
FAQs
Can I use store-bought whipped topping instead of homemade?
Yes, store-bought whipped topping like Cool Whip works well and saves time.
How do I keep the ice cream layers from melting while assembling?
Work quickly and freeze the cake after adding each layer to keep it firm. You can also chill your mixing bowl and utensils before use.
Can I use different types of cookies for the crunch layer?
Yes, graham crackers, chocolate chip cookies, or even pretzels work well for a unique texture and flavor.
Can I make this ice cream cake without a springform pan?
Yes, a regular cake pan will work, but lining it with plastic wrap is essential for easy removal.
How do I smooth out the ice cream layers?
Use a spatula dipped in warm water to smooth the layers evenly.
Can I add extra layers?
Absolutely! You can add extra ice cream layers or mix in fruit, nuts, or candy pieces for additional texture.
How long does it take to soften ice cream for spreading?
Leave the ice cream at room temperature for 10–15 minutes or microwave in short 10-second bursts until soft but not melted.
Can I use homemade ice cream?
Yes, homemade ice cream works perfectly but be sure to freeze each layer until firm before adding the next.
Can I make this cake gluten-free?
Yes, use gluten-free cookies for the crunch layer and ensure your ice cream and fudge sauce are gluten-free.
What’s the best way to cut an ice cream cake?
Use a sharp knife dipped in hot water and wipe it clean between slices for neat, easy cuts.
Conclusion
This Copycat Dairy Queen Ice Cream Cake is a dreamy, creamy dessert that brings all the nostalgia of the classic DQ cake right into your kitchen. With layers of rich ice cream, gooey fudge, and crunchy cookie crumbles, it’s perfect for birthdays, summer parties, or any celebration. Best of all, it’s easy to customize and even easier to devour—no drive-thru required!
PrintCopycat Dairy Queen Ice Cream Cake Recipe
This homemade Copycat Dairy Queen Ice Cream Cake features layers of creamy vanilla and chocolate ice cream, a rich fudge sauce, and that classic crunchy chocolate layer—all topped with fluffy whipped frosting. It’s the perfect celebration dessert for any occasion and tastes just like the real thing!
- Prep Time: 30 minutes
- Cook Time: 6 hours
- Total Time: 6 hours 30 minutes
- Yield: 12 servings 1x
- Category: Dessert
- Method: Freezing
- Cuisine: American
Ingredients
For the Cake Layers:
- 1.5 quarts vanilla ice cream (softened)
- 1.5 quarts chocolate ice cream (softened)
For the Chocolate Crunch Layer:
- 24 Oreo cookies, crushed
- ½ cup hot fudge sauce (store-bought or homemade)
For the Whipped Frosting:
- 2 cups heavy whipping cream
- ¼ cup powdered sugar
- 1 teaspoon vanilla extract
For Decoration (Optional):
- Sprinkles
- Chocolate shavings
- Extra fudge sauce
- Maraschino cherries
Instructions
-
Prepare the Pan:
- Line a 9-inch springform pan with plastic wrap or parchment paper for easy removal.
- If you don’t have a springform pan, use a deep cake pan lined with enough overhanging plastic wrap to lift the cake out later.
-
Make the Crunch Layer:
- Mix crushed Oreos with the hot fudge sauce until well combined. Set aside.
-
Layer the Cake:
- Bottom Layer: Spread the softened chocolate ice cream evenly into the bottom of the pan. Freeze for 30 minutes until firm.
- Crunch Layer: Spread the Oreo-fudge mixture evenly over the chocolate ice cream layer. Freeze for 15 minutes until set.
- Top Layer: Spread the softened vanilla ice cream over the crunch layer and smooth the top. Freeze for at least 4 hours or until completely firm.
-
Make the Whipped Frosting:
- In a chilled bowl, beat the heavy cream, powdered sugar, and vanilla extract together until stiff peaks form.
- Frost the top and sides of the frozen cake with whipped cream.
-
Decorate:
- Drizzle with extra fudge sauce, add sprinkles, chocolate shavings, or cherries for a festive finish.
-
Serve:
- Freeze the finished cake for at least 2 more hours or overnight before serving.
- Let the cake sit at room temperature for 10-15 minutes before slicing for easier cutting.
Notes
- Swap out the vanilla and chocolate ice cream flavors for your favorites (like mint chocolate chip or strawberry).
- Add a layer of caramel sauce for extra richness.
- Store leftovers tightly wrapped in the freezer for up to 2 weeks.