
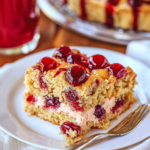
Peanut Butter and Jelly Poke Cake is a fun and nostalgic dessert that combines the classic flavors of a PB&J sandwich in a moist, flavorful cake. This easy poke cake is filled with sweet jelly, topped with a creamy peanut butter frosting, and perfect for parties, potlucks, or a special treat at home.
Why You’ll Love This Recipe
- Combines the classic flavors of peanut butter and jelly in a fun cake form
- Easy to make using a cake mix and simple ingredients
- Perfectly moist with jelly filling in every bite
- Great for parties, celebrations, and family gatherings
- Kid-friendly and fun to make
Ingredients
(Tip: You’ll find the full list of ingredients and measurements in the recipe card below.)
For the Cake:
- 1 box white or yellow cake mix (plus ingredients listed on the box)
- 1 cup strawberry or grape jelly (or your favorite flavor)
- 1/4 cup water (to thin the jelly if needed)
For the Peanut Butter Frosting:
- 1 cup creamy peanut butter
- 1/2 cup unsalted butter, softened
- 2 cups powdered sugar
- 1/2 cup heavy cream or milk
- 1 teaspoon vanilla extract
Optional Toppings:
- Chopped peanuts
- Fresh berries
- A drizzle of additional jelly or peanut butter
Directions

Make the Cake
- Bake the Cake:
- Prepare the cake mix according to the package instructions.
- Bake in a 9×13-inch pan and let it cool for about 10 minutes.
- Poke Holes in the Cake:
- Use the handle of a wooden spoon or a straw to poke holes all over the cake, about 1 inch apart.
- Fill with Jelly:
- In a small bowl, mix the jelly with water to thin it slightly.
- Pour the jelly evenly over the cake, making sure it fills the holes. Let the cake cool completely.
Make the Peanut Butter Frosting
- Beat the Butter and Peanut Butter:
- In a large bowl, beat the softened butter and peanut butter until smooth and creamy.
- Add Sugar and Vanilla:
- Gradually add powdered sugar, heavy cream, and vanilla extract.
- Beat until the frosting is light and fluffy. Add more cream if needed for a spreadable consistency.
- Frost the Cake:
- Spread the peanut butter frosting evenly over the cooled cake.
- Garnish:
- Optionally, sprinkle with chopped peanuts, fresh berries, or drizzle with extra jelly or melted peanut butter.
Servings and Timing
- Servings: 12-16
- Prep Time: 15 minutes
- Cook Time: 25-30 minutes
- Chill Time: 30 minutes
- Total Time: 1 hour 15 minutes
Variations
- Chocolate PB&J Cake: Use a chocolate cake mix for a richer flavor.
- Crunchy Topping: Add crushed graham crackers or pretzels on top for extra crunch.
- Berry Blast: Use mixed berry jelly and top with fresh raspberries, blueberries, or strawberries.
- Gluten-Free Option: Use a gluten-free cake mix to accommodate dietary needs.
- Swirled Jelly Frosting: Mix a few tablespoons of jelly into the frosting for a fun swirl effect.
Storage/Reheating
- Refrigerator: Store covered in the refrigerator for up to 4 days.
- Freezing: Freeze the unfrosted cake for up to 2 months. Thaw before adding the frosting.
- Reheating: Not necessary, as this cake is served chilled or at room temperature.
FAQs
1. Can I use homemade jelly for this recipe?
Yes, homemade jelly or jam works great and adds a personal touch.
2. What type of peanut butter is best for the frosting?
Creamy peanut butter works best for a smooth, spreadable frosting. Avoid natural peanut butter, as it can separate.
3. Can I make this cake ahead of time?
Yes, you can make and refrigerate the cake a day ahead. Add the frosting just before serving for the best texture.
4. How do I prevent the cake from getting soggy?
Ensure the cake is fully cooled before adding the jelly and avoid over-saturating the cake.
5. Can I use a different type of frosting?
Yes, cream cheese frosting or a simple whipped topping would also taste great.
6. What if my frosting is too thick?
Add a bit more heavy cream or milk, a tablespoon at a time, until you reach the desired consistency.
7. How do I keep the jelly from clumping?
Warming the jelly slightly and mixing it with water helps it pour smoothly over the cake.
8. Can I use different flavors of jelly?
Absolutely! Try grape, raspberry, or mixed berry jelly for variety.
9. How do I make the cake extra moist?
You can replace water with milk or add a spoonful of sour cream to the cake batter for extra moisture.
10. Can I make this as cupcakes instead of a sheet cake?
Yes, divide the batter into a cupcake tin and follow the same method of filling with jelly and frosting.
Conclusion
Peanut Butter and Jelly Poke Cake is a fun and nostalgic dessert that brings the beloved flavors of a PB&J sandwich into a sweet, creamy cake. Easy to make and perfect for any occasion, this poke cake is sure to be a hit with kids and adults alike. With its moist, jelly-filled cake and rich peanut butter frosting, every bite is a delicious trip down memory lane!
PrintPeanut Butter and Jelly Poke Cake
This Peanut Butter and Jelly Poke Cake is a fun and nostalgic dessert with all the flavors of the classic sandwich! A moist vanilla or yellow cake is filled with sweet jelly, topped with a creamy peanut butter frosting, and finished with swirls of more jelly. Perfect for parties, picnics, or a sweet treat for PB&J lovers!
- Prep Time: 20 minutes
- Chill Time: 1 hour
- Cook Time: 30 minutes
- Total Time: 1 hour 50 minutes
- Yield: 12 servings 1x
- Category: Dessert, Cake
- Method: Baking
- Cuisine: American
Ingredients
For the Cake:
- 1 box (15.25 oz / 432 g) yellow or white cake mix (plus ingredients needed per package)
- 1 cup grape or strawberry jelly (or your favorite flavor)
For the Peanut Butter Frosting:
- 1 cup (250 g) creamy peanut butter
- 1/2 cup (115 g) unsalted butter, softened
- 2 cups (250 g) powdered sugar
- 1/4 cup (60 ml) milk (more as needed)
- 1 teaspoon vanilla extract
For Topping:
- 1/4 cup grape or strawberry jelly (warmed slightly for drizzling)
- 1/4 cup chopped peanuts (optional)
Instructions
🍰 Bake the Cake:
-
Prepare the Cake Mix:
- Preheat your oven to 350°F (175°C).
- Prepare and bake the cake according to the package instructions in a 9×13 inch (23×33 cm) baking dish.
-
Cool the Cake:
- Let the cake cool for about 10 minutes after baking.
🔪 Poke the Cake:
-
Make the Holes:
- Use the handle of a wooden spoon or a straw to poke holes all over the cake, about 1 inch apart.
-
Fill with Jelly:
- In a microwave-safe bowl, warm the 1 cup of jelly for 30 seconds to make it pourable.
- Pour or spoon the jelly into the holes, allowing it to seep in.
🥜 Make the Peanut Butter Frosting:
-
Beat the Ingredients:
- In a large bowl, beat peanut butter and softened butter until creamy.
- Gradually mix in powdered sugar, vanilla extract, and milk until smooth and fluffy.
-
Adjust Consistency:
- Add a bit more milk if the frosting is too thick, until it is spreadable.
🍫 Assemble the Cake:
-
Frost the Cake:
- Once the cake is completely cool, spread the peanut butter frosting evenly over the top.
-
Add the Jelly Swirls:
- Warm the remaining 1/4 cup of jelly and drizzle over the frosting.
- Use a knife or toothpick to gently swirl the jelly into the frosting for a marbled effect.
-
Add Toppings:
- Sprinkle with chopped peanuts for extra crunch (optional).
🍽️ Serve:
-
Slice and Enjoy:
- Cut into squares and serve as a delicious dessert or party treat.
-
Serving Suggestions:
- This cake is perfect as a fun potluck dish, birthday treat, or just to satisfy your PB&J cravings!
Notes
- Storage: Keep the cake covered in the refrigerator for up to 3 days.
- Make It Easier: Use pre-made whipped topping instead of homemade frosting if needed.
- Flavor Variations: Swap grape or strawberry jelly for raspberry, apricot, or your favorite fruit preserves.