
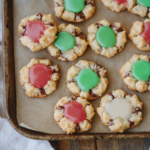
Thumbprint Cookies with Icing are a delightful treat that combines a buttery cookie base with a sweet and colorful icing center. These classic cookies are perfect for holidays, special occasions, or anytime you’re in the mood for something simple yet indulgent. Their melt-in-your-mouth texture and charming appearance make them a favorite for all ages.
Why You’ll Love This Recipe
- Buttery and tender cookies with a touch of sweetness.
- Fun to customize with different icing colors and flavors.
- Easy to make with basic ingredients.
- Perfect for gifting, parties, or as an everyday treat.
- A versatile recipe that can adapt to various holidays or themes.
Ingredients
(Tip: You’ll find the full list of ingredients and measurements in the recipe card below.)
For the Cookies
- Unsalted butter, softened
- Granulated sugar
- Egg yolk
- Vanilla extract
- All-purpose flour
- Salt
For the Icing
- Powdered sugar
- Milk (or heavy cream for a richer icing)
- Vanilla or almond extract
- Food coloring (optional)
Directions

- Preheat the Oven: Set your oven to 350°F (175°C) and line baking sheets with parchment paper.
- Make the Dough: In a large mixing bowl, cream the butter and sugar together until light and fluffy. Beat in the egg yolk and vanilla extract. Gradually add flour and salt, mixing until a soft dough forms.
- Shape the Cookies: Roll the dough into 1-inch balls and place them on the prepared baking sheets, spacing them about 2 inches apart.
- Make the Thumbprints: Press your thumb or the back of a spoon into the center of each ball to create an indentation.
- Bake: Bake for 10-12 minutes, or until the edges are lightly golden. Remove from the oven and allow the cookies to cool on the baking sheets for 5 minutes, then transfer to a wire rack to cool completely.
- Prepare the Icing: In a bowl, whisk together powdered sugar, milk, and extract until smooth. Divide the icing into bowls and tint with food coloring if desired.
- Fill the Thumbprints: Spoon or pipe the icing into the indentations of each cooled cookie. Allow the icing to set before serving or storing.
Servings and Timing
- Servings: Makes approximately 24 cookies
- Prep Time: 15 minutes
- Cook Time: 12 minutes
- Total Time: 27 minutes
Variations
- Jam-Filled: Replace the icing with your favorite jam or preserves for a fruity twist.
- Chocolate Center: Fill the thumbprints with melted chocolate or Nutella.
- Gluten-Free: Use a gluten-free all-purpose flour blend.
- Almond Twist: Add almond extract to the dough for a nutty flavor.
- Holiday-Themed: Use red and green icing for Christmas or pastel colors for Easter.
Storage/Reheating
- Storage: Store in an airtight container at room temperature for up to 5 days.
- Freezing: Freeze unfilled cookies in a sealed container for up to 3 months. Thaw at room temperature and add icing before serving.
FAQs
Can I use salted butter?
Yes, but omit the additional salt in the recipe.
How do I keep the cookies from spreading?
Chill the dough for 30 minutes before shaping to prevent excessive spreading.
Can I make the dough ahead of time?
Yes, you can refrigerate the dough for up to 3 days or freeze it for up to 3 months.
What’s the best way to fill the thumbprints?
Use a small spoon or piping bag for neat and easy filling.
Can I double this recipe?
Absolutely! This recipe scales well for larger batches.
Can I use royal icing instead of a simple icing?
Yes, royal icing works well and sets more firmly, making the cookies stackable.
What’s the best extract for the icing?
Vanilla extract is classic, but almond or lemon extract adds a unique flavor.
Can I add sprinkles to the icing?
Yes, add sprinkles before the icing sets for a festive touch.
Are these cookies suitable for kids to make?
Yes, they’re simple and fun for kids to help shape and decorate.
Can I make these cookies vegan?
Use a plant-based butter alternative and replace the egg yolk with 1 tablespoon of plant-based milk or applesauce.
Conclusion
Thumbprint Cookies with Icing are a classic, easy-to-make dessert that adds charm and flavor to any occasion. Whether you’re decorating them for a holiday or enjoying them as a simple treat, these cookies are always a hit. Customize them with your favorite icing colors and flavors to make them uniquely yours, and enjoy the delightful combination of buttery cookie and sweet icing in every bite!
PrintThumbprint Cookies with Icing
These classic Thumbprint Cookies are buttery, tender, and filled with a sweet icing center. Perfect for holidays, tea parties, or as an everyday treat, they’re simple to make and fun to decorate!
- Prep Time: 20 minutes
- Cook Time: 12 minutes
- Total Time: 32 minutes
- Yield: About 24 cookies 1x
- Category: Dessert, Cookies
- Method: Baking
- Cuisine: American
Ingredients
For the Cookies:
- 1 cup (225 g) unsalted butter, softened
- 2/3 cup (135 g) granulated sugar
- 1 large egg yolk
- 1 tsp vanilla extract
- 2 cups (250 g) all-purpose flour
- 1/4 tsp salt
For the Icing:
- 1 cup (120 g) powdered sugar
- 1–2 tbsp milk or cream
- 1/2 tsp vanilla or almond extract
- Food coloring (optional)
Instructions
1. Preheat the Oven:
- Preheat your oven to 350°F (175°C). Line two baking sheets with parchment paper.
2. Make the Dough:
- In a large mixing bowl, beat the softened butter and sugar together until light and fluffy.
- Add the egg yolk and vanilla extract, mixing until combined.
- Gradually add the flour and salt, mixing until a soft dough forms.
3. Shape the Cookies:
- Roll the dough into 1-inch balls and place them on the prepared baking sheets, spacing them about 2 inches apart.
- Use your thumb or the back of a spoon to gently press a shallow indentation into the center of each cookie.
4. Bake the Cookies:
- Bake for 10-12 minutes, or until the edges are lightly golden.
- If the indentations puff up during baking, gently press them down again with a spoon immediately after removing the cookies from the oven. Let the cookies cool completely on the baking sheets.
5. Make the Icing:
- In a small bowl, whisk together the powdered sugar, milk, and vanilla extract until smooth. Add food coloring if desired.
6. Fill the Cookies:
- Spoon or pipe the icing into the indentations of each cooled cookie. Let the icing set for 15-20 minutes before serving.
Notes
- For a fruity twist, replace the icing with jam or preserves.
- Store the cookies in an airtight container at room temperature for up to 1 week.
- Add sprinkles or edible glitter to the icing for a festive look.